Review: Aquatica Pro A7rIV housing by Phil Rudin
The Sony A7R IV was named DPReviews 2019 Product of the year and High-End Interchangeable Lens Camera of the year. The Sony was also named the best camera of 2019 for landscape and portrait photography. The Sony A7R IV is also one of the top full frame cameras for underwater photography.
In November 2019, the DEMA show was held in Orlando, Florida, USA. DEMA is the largest business to business dive trade show globally, and the imaging section is one of the largest areas of the DEMA show. At DEMA 2019, most housing manufacturers had housings and accessories for the Sony A7R IV.
Sony Alpha A7R MKIV camera
In issue 111 of UwP Magazine, I reviewed the A7R IV, so rather than to repeat this, I would refer you to my article, which is available as a free PDF download as a back issue. However, I have copied into this article the features of the Sony A7R IV that I have found most useful for underwater photography.
The A7R IV has a new imaging processor and autofocus algorithms, which include realtime tracking in AF-C. This autofocus system works so well that I have abandoned back button focusing and AF-S relying instead on the Lock-on AF Expanded Flexible Spot AF in the AF-C mode. This combination allows me to lock focus with a half-press of the shutter and then drag the focus point around the frame while maintaining the original focus area. This means I can focus on an animal’s eye in the center of the frame and then drag it around the frame for the best composition without losing the tack-sharp focus on the eye. The lock-on expanded flexible spot also allows you to adjust the speed that you drag the focused point around the frame. I have changed the factory default setting and sped up the movement to meet my needs. Another subtle but handy update in the A7R IV is that the focus area box can be reduced or enlarged in size to fit the user’s needs. The box can also be set to appear white or red, which makes it much easier to see than the original gray box in older Sony A7/A7R versions.
Many readers have asked me about the new implementation of animal eye autofocus in the A7R IV and A7R III firmware update. With limited testing, I have found the animal eye AF is at best hit or miss underwater, while human eye-AF has worked well with models.
The most endlessly discussed feature of the new A7R IV in forums and chat rooms is its 61MP full frame sensor. Who is it for, why does anyone need so much resolution, will I need a new computer to handle the file sizes and on and on? The 61MP A7R IV provides exceptional image quality with plenty of dynamic range and an ability to do large crops. In the APS-C mode, the focus points cover the entire frame and produce an excellent 26.2MP image, which is larger than most 24MP current APS-C cameras. This matters to me because I get a faster workflow and additional options when shooting, especially in macro.
In common with other full frame cameras offering the option of shooting in cropped sensor format, this increases the effective focal length of lenses. In this case, the Sony FE 90mm f/2.8 macro lens (a must-have for underwater macro shooters) gives an AOV equivalent of a 135mm macro lens, extending my lens range and the FE 50mm macro lenses, a 75mm. I am aware that I can just crop the FF image to achieve APS-C or other format sizes. However, what I see in the viewfinder in APS-C mode is precisely what I get giving me two cameras in one with all of the additional features of the A7R IV system.
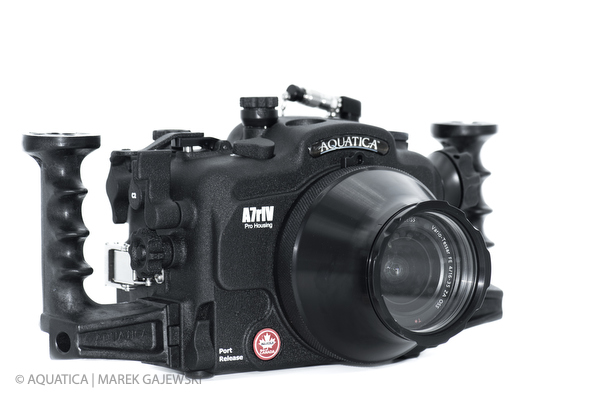
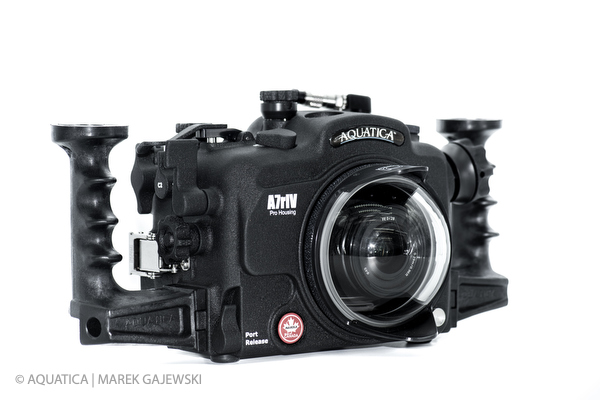
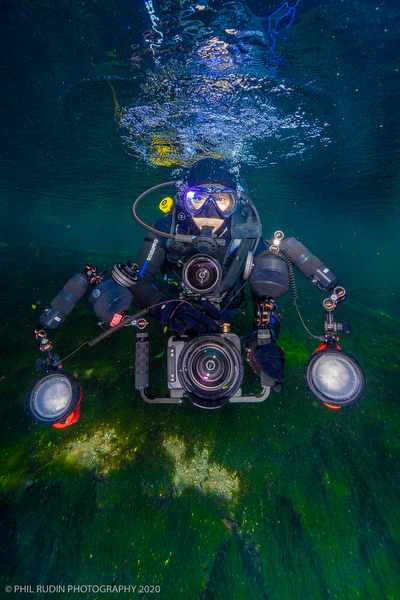
Aquatica A7rIV Pro Housing and Ports
Aquatica is a Montreal-based Canadian company founded in 1982 as Aqua Vision Systems and later renamed Aquatica. Aquatica is the leading manufacturer of quality aluminum underwater housings in North America. Every Aquatica housing is machined in-house from a single aluminum block by a highly specialized five-axes CAD driven machine. The housing is then anodized to military specifications and powder-coated with special environmental-resistant paint. The finished product is durable, and the craftsmanship is first-rate. The housing has excellent ergonomics, which are user friendly, and the control layout is simple even for those wearing heavy gloves.
I have previously owned two Aquatica housings for Nikon F-3 film cameras in the mid-1990s before moving to a Nikonos RS. I sold one of the F-3 housings to a Professor now living in California who contacted me about two years ago looking for my recommendations regarding moving to digital. After a brief conversation, I asked about the Aquatica F-3 housing, and the Professor advised he was still shooting with the F-3 housing regularly. The quality and durability of the Aquatica line have been well documented for decades.
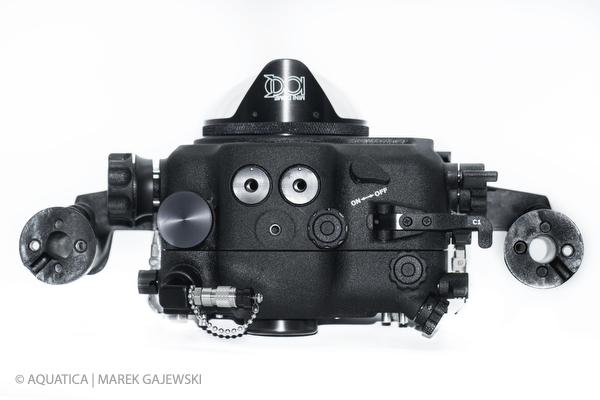
The Aquatica Pro A7rIV housing is the third generation of Aquatica housings for the Sony A7R line of full frame mirrorless cameras. This is my first Aquatica digital housing review, and when the test housing arrived, one of the first things I noticed was its excellent finish. The housing ships with the Surveyor Vacuum system, valve, sensor, and pump included as standard equipment. It is available with three possible bulkhead configurations: Twin Nikonos sync cord connectors, one Ikelite connector, or dual optical connectors.
My test housing was shipped with dual optical connectors which support a variety of strobes. For this review, I used two Inon Z-330 strobes or two Backscatter Mini Flash OS-1’s, both with fiber optic cords. The housing also has an HDMI 2.0 compatible bulkhead opening for the optional monitor/recorder cables.
The A7rIV Pro housing is made from aerospace-grade 6061 T6 aluminum with T304 stainless steel push buttons. All of the cameras function buttons, and dials are accessible, including support for back button autofocus with the AF-On control using the right thumb and triggering with the right forefinger. I have programmed the left C3 button on the A7R IV to toggle between EVF and LCD. I also programmed the right AEL button to toggle between full frame and APS-C. Both of these controls have larger than standard push buttons that fall directly under my thumbs, so finding these buttons without looking away from the viewfinder was a breeze. All of the other buttons and dials on the rear of the housing can easily be controlled with your thumbs even while wearing gloves.
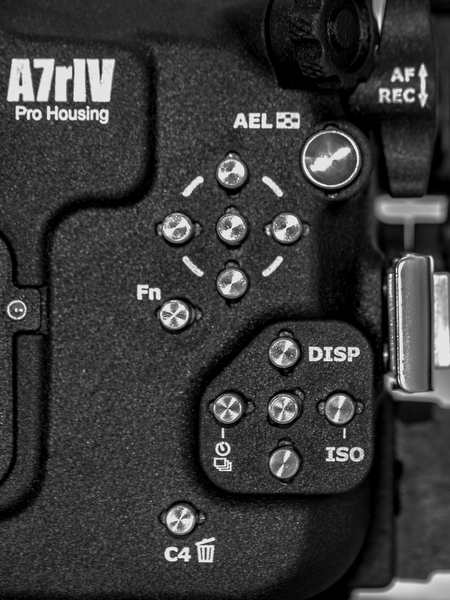
The rear of the housing has two sets of up/down right/left OK button arrays. The set on the top right of the housing can be used to scroll over the more than 500 autofocus points on the sensor. The lower right set controls the display, ISO, drive mode, and more. The control buttons and dials can also be reprogrammed on the camera to suit just about any need.
Levers on the right side of the housing control back-button AF and Video on/off with a second lever controlling focus area, and the left-hand thumb lever controls the image review. Again these camera functions can be reprogrammed if required. I reprogrammed the video on/off and moved it onto the mode dial to avoid accidental recording while shooting stills. To record video, I select the video mode on the mode dial and use the shutter lever to start and stop recording. The back half of the housing has a pickup viewfinder, which works well with the spectacular 5.76M dot electronic viewfinder.
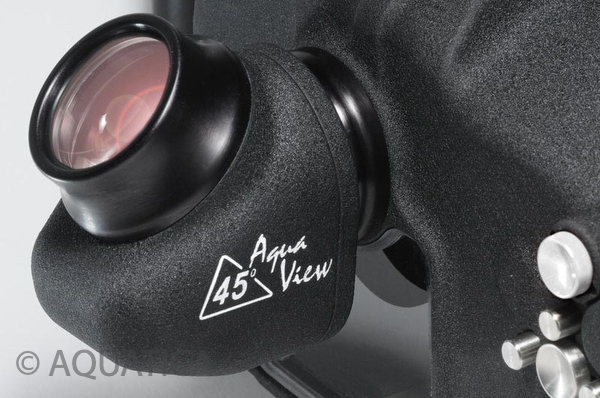
My recommendation for the A7rIV Pro housing would be to add one of Aquatica’s 45 or 180-degree Aqua View accessory viewfinders to take full advantage of the outstanding EVF. The back half of the housing also contains the vacuum system electronics, which is powered by a user-replaceable 3V CR2032 battery. Two stainless pins at the bottom of the back align with the front of the housing to assist in getting a proper O-ring seal. Two locking buckles then secure the front to the rear of the housing.
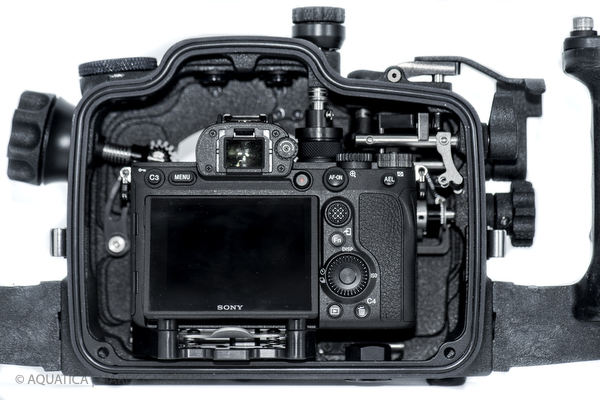
The housing comes with a camera tray that attaches to the bottom of the camera using the tripod thread mount. The tray includes a lens release button control and a positive locking device to secure it within the housing. Once mounted, the camera will not shift at all, keeping it perfectly aligned. To install the camera, pull up the mode control wheel and slide the tray onto the two stainless rods in the front half of the housing. Once the tray locks into place, the camera will not move or fall out of the housing, even if held upside-down. I found that once mounted, the camera’s controls aligned perfectly. It needs to be removed from the housing to change the camera’s batteries, but it does not need to be dismounted from the tray.
Both memory cards can be removed and reinstalled while the camera is locked into the front half of the housing.
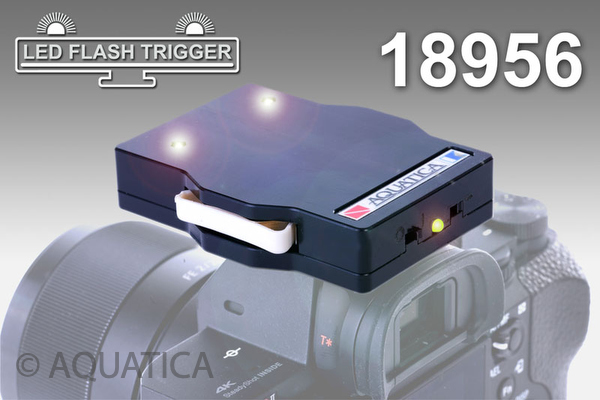
The Aquatica flash trigger for Sony Alpha cameras can be mounted into the camera’s hot shoe with it in the housing. The flash trigger is for manual flash control only (not TTL) and supports two fiber optic cords. The flash trigger is powered by two 3V CR 2450 batteries that slide into the sides of the trigger. A small switch on the left rear of the flash trigger turns-on the trigger and test-fires the two small LED lights. A green LED on the back of the trigger also lights up to show the trigger is activated and then turns off after a few seconds to conserve battery power.
While field-testing the housing system, the flash trigger worked flawlessly. The housing also has plenty of room for an aftermarket Sony TTL flash if preferred.
For this review, Aquatica sent me ports, gears, and port extensions to support several FE lenses. The ports and extensions are the same as those used for Aquatica DSLR housings making it a bit more cost-effective for DSLR owners making a move to Sony full frame.
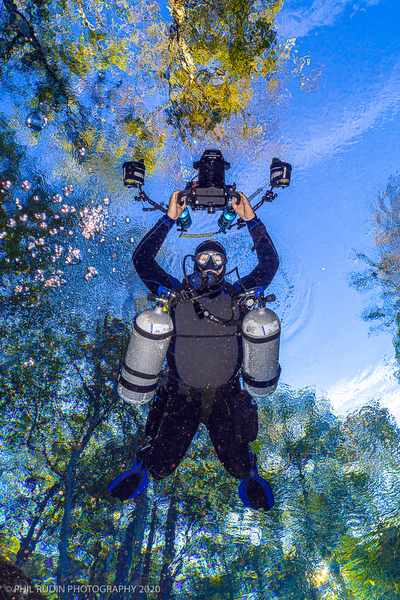
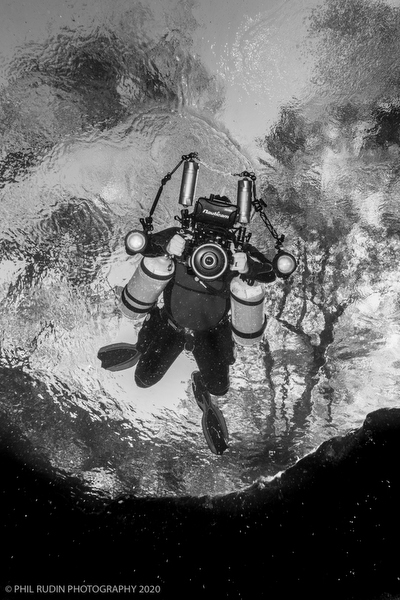
Field Testing the Aquatica Pro A7rIV Housing System
Let me start by saying that Sony has arrived and that the A7RIV system is no longer a work in progress. The A7RIV is a huge improvement over the A7R III that I reviewed in 2017. However, Sony’s lens options are not as complete as those available for Canon or Nikon EF and F mount. (* Editor’s note: At the time of writing, there is no native Sony full-frame autofocus fisheye lens available*.)
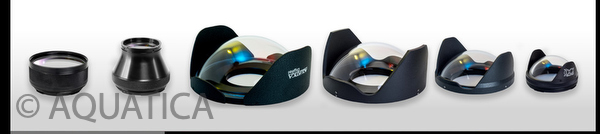
For this review, I selected the Sony FE 90mm f/2.8 Macro G OSS lens, which easily handles the A7RIV 61MP sensor and is without question the best macro lens I have ever used with any camera. The 90 macros was paired with the Aquatica 1840 macro port and 28.5mm port extension (48453). Aquatica also provided the ACU10 +10 close-up lens (19353) and the ACU 19355 single flip adapter. The flip adapter and close-up lenses are suitable for shooting in both full frame or APS-C formats.
For wide angle, I used the super wide (122-84 AOV) rectilinear Sony FE 12-24mm f/4 G zoom. This lens was paired with the 200mm (8-inch) acrylic dome port with removable shade blades (18405), 63.5mm port extension (48458), and zoom gear (49107). This combination works well at high (f/13 and above) F-numbers, but I recommend the Aquatica 230mm (9.25-inch #18407) glass dome for best corner sharpness.
I also used the 200mm port with a 28.5mm port extension (48453) for the 114 degrees AOV Rokinon AF 14mm f/2.8 FE for Sony, which is not listed on Aquatica’s port chart. Again I would recommend the 230mm (9.25-inch #18407) glass dome for best corner sharpness.
Sony has not yet to released an FE fisheye lens, so I have been using the Canon 8-15mm f/4L Fisheye with a Metabones IV lens adapter. The Canon Fisheye was also used with the 200mm dome port with shade blades removed for circular Fisheye and 39.5mm port extension 48462. All four of Aquatica’s dome ports, including the small 152mm (6-inch) acrylic Port, can be used with the Canon fisheye zoom with the shade removed at the 8mm (circular) end of the lens.
Be aware that like all 200mm acrylic ports, buoyancy is an issue compared to Aquatica’s 230mm and 200mm glass ports. The acrylic ports tend to turn port up, putting a strain on your right wrist if holding the housing for long periods. The Aquatica dome shade is drilled for attaching counterweights to help resolve this issue.
I configured the 90mm macro lens with the focus limiter set from 1:1 to infinity in autofocus. On past Sony A7 cameras, I always set the focus limiter from 1:1 to 0.5 meters, which renders everything from life-size, 1:1 to about 1:10 in focus. I find that most of the macro/close-up subjects I want to photograph fall well within that shooting range. As I have said in past reviews, it takes a few dives to get the hang of shooting within this rather short focusing range. By using the focus limiter, I find that the lens is less likely to hunt and that the lens acquires focus more quickly than when it is set from 1:1 to infinity. With the A7R IV set to AF-C with tracking flexible spot, the camera does not hunt as it did with prior versions set to infinity.
Aquatica also offers a manual focus gear for the 90mm macro allowing you to switch from AF to manual in the menu. This allows me to rack the lens out to 1:1 and leave it there while using the ACU+10 for the highest magnification. Once I have a subject in focus at 1:1, I can flip the ACU+10 into place and just move the port closer to the subject to regain focus in the viewfinder. I used the ACU+10 close-up lens in AF for this review but found that some subjects are easier to acquire using manual focus. I use the same f/13 starting point and shoot at ISO-64 to ISO-200 for most macro work. I set the shutter speed at 1/250th sec. and tweak for the best background results. The housing was well balanced with the recommended Aquatica macro port configuration without the need for any added buoyancy.
The Aquatica zoom gear for the Sony FE 12mm-24mm f/4 is 3D printed and just slides over the lens being held in place by thin rubber tubing on the inside of the gear. I found that this simple system worked very well and that it remained in place once mounted in the housing. The camera with the FE 12-24mm zoom can be mounted from the rear of the housing or the front before the port and extension are mounted over the lens. Once installed, the lens zooms smoothly, and autofocus is excellent to the dome port. The best results for the depth of field and corner sharpness are at f/13 or higher. Most photographers will be more than happy in the f/8 to f/16 range, but for best corner sharpness, f/13 or higher renders the best results. The f/13 and above aperture setting is my standard starting point across all full frame DSLR or mirrorless cameras with like AOV lenses, not just the Sony cameras.
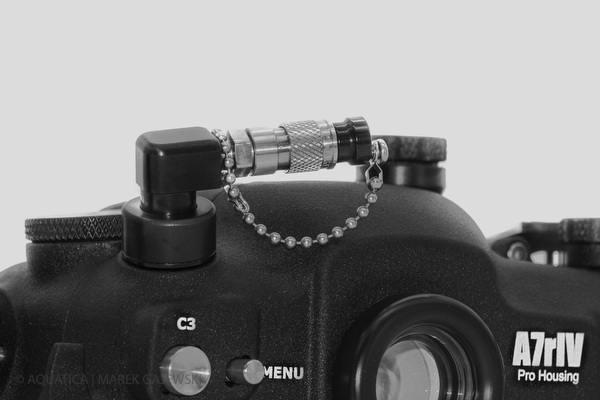
The very last thing I do before heading out for a dive is to turn on the flash trigger, test fire the strobes, then seal the housing and draw the vacuum. To draw the vacuum, you must turn on the system before closing the housing using the on/off switch on the electronics. Once the housing buckles are secure, the plug is removed from the vacuum valve, and the pump is attached. Use the pump to draw the vacuum until the green LED on the left rear of the housing remains a steady green, but be careful not to over pump. The green light will then remain on throughout the dive until the vacuum is released by opening the valve on the vacuum pump. Don’t forget to replace the plug (which is secured to the valve by a chain) in the vacuum valve. The pump supplied with my test housing was a bit flimsy and not up to Aquatica’s high standards.
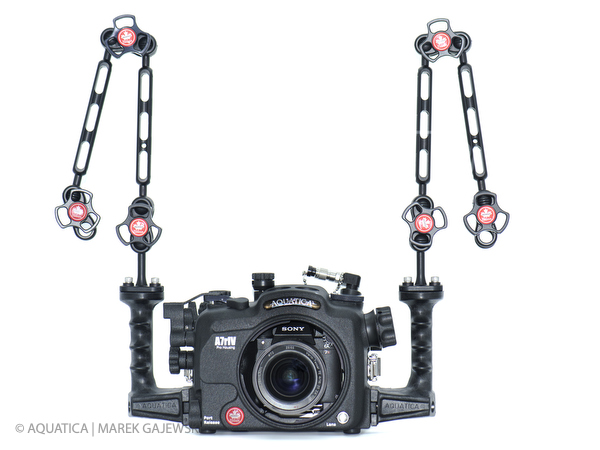
For my review, I shot stills using four Delta 3 Technical Lighting Control eight-inch strobe arms with TLC clamps. Technical Lighting Control is an Aquatica owned lighting support company that offers arms, clamps, ball heads, and other support equipment. These arms integrate easily with the ball heads on my two Inon Z-330 strobes and with the two Backscatter Mini Flash OS-1’s I used for this review. I like the TLC arms and clamps; they are smooth and easy to move, yet never drooping or collapsing in the water.
For those of you thinking about moving from a sub-full frame system to a full-frame system, remember the reduced depth of field at any given f/stop over sub-full frame may emphasize any flaws in user technique. The shallower DOF associated with full frame cameras requires precise focus. Also, high megapixel cameras like the Sony A7R III and especially the A7R IV tend to highlight the flaws of any optical system, so lens choice and port selection are critical.

In the water, the Aquatica A7rIV Pro housing is well balanced and easy to use. All of the controls fall at your fingertips, and after a few dives, I did not find myself having to look away from the viewfinder to change any of my camera settings. The bayonet mounted ports and extensions were easy to change in the field, and I often did lens changes from the front of the housing without needing to remove the camera. The extension rings for the type 4 port system have a unique lock on the outside of the extension, which is very easy to use. This housing is compact and very easy to carry. The housing grips are removable, making the housing simple to pack into a carry-on bag or for shipping. The ACU flip adapter held the ACU +10 close-up lens out of the way of the port and strobes at all times when not in use.
The Aquatica A7rIV housing retails in the US with any of the bulkhead configurations for $2949.00. The eight-inch acrylic port is around $580.00, the 9.25-inch optical glass port is $1760.00, and the Macro port is $419.00. Port extensions begin at about $250.00.
If you are seeking the very best in image quality and a full frame camera with quality lenses is within your budget, the Sony Alpha A7R IV and Aquatica Pro A7rIV housing should be on your shortlist for consideration.
Thanks to Aquatica for loaning the equipment for my review and to Pura Vida Divers for assistance during some diving operations.
About the Author
Based in Florida, Phil began taking underwater photographs while he was in the U.S. Navy. He is now a freelance writer, photo instructor, and travel photographer. As a seven-time President of the South Florida Underwater Photography Society, Phil has served on the Board of Directors for over twenty years. He enjoys the diverse makeup of the club’s members. Phil’s images have appeared in a variety of magazines, including Popular Science, Reflections, Scuba Diving, Underwater Journal, Skin Diver, Florida Underwater, South Florida Adventures, MexicanDiver.com, and Underwater Photography Magazine where he is the Senior Reviewer. Phil teaches underwater photography workshops for Reef Photo & Video, Underwater Digital Fiesta, Splash Dive Center Belize, Hasselblad Xcursion, and others. Phil also lectures on travel destinations and photography around the country.
You can see more of his work on Facebook and Instagram.
Thanks to Aquatica and Marek Gajewski for housing images.