Review: Nauticam Wide Angle Corrector Port
WHY USE WATER CONTACT OPTICS?
The short answer is that these are lenses designed to work in water, rather than in air. All the big optical problems of ports (that main bottleneck in underwater wide angle image quality) occur because of the air to water interface. Water contact optics properly correct for this interface and therefore image quality rockets up.
For us to understand it fully, and to appreciate why Nauticam have put so much hard work into designing this lens we need to examine why we use domes ports, their strengths and their weaknesses, because the reason for using water contact optics is to overcome these weaknesses.
Before the 1960s, all underwater photos were taken through flat windows, the port hole in the housing (this is where the word “ports” comes from). We still use them with longer focal length macro lenses where their optical shortcomings are not a big problem. All flat ports suffer from strong refraction when light passes through the flat water/air interface at an angle. The greater this angle (i.e. the wider the lens sees) the worse the problems become. The main optical problems of a flat port in water are a FOV reduction by about 33%, pincushion distortion, blurring of detail and color fringing — all of which get worse and worse towards the corners.

It is worth noting that when light passes straight through a flat port (i.e. at 90˚ to the water/air interface) there is no refraction and no problems. This is actually how dome ports solve all the problems of flat ports. The spherical shape of the port means that as the lens sees wider and wider, it still encounters a port that is at 90˚, so the light passes through un-refracted. This is why dome port positioning (i.e. your port extension length) is critically important.

The first record of a dome port being used underwater was by the French Navy in 1931. The first underwater photographers to publicize the use of dome ports were Flip Schulke and Walter Starck in around 1963/4 (both of them also shooting the first split level shots to show the angle of coverage of the lens remained the same.)
As most underwater photographers know, dome ports are great, but not perfect. The most noticeable downside of the curved water/air interface is that it acts as a simple negative lens and creates a virtual image of the subject. The virtual image is much closer to the port than the real subject (not that big of a deal) and curved in parallel with the port (a significant problem). We must focus on this virtual image to have the subject in focus, but lenses are designed to focus on flat images and because the virtual image curves more towards the edges of the frame, detail becomes increasingly out of focus, or blurred. This is the primary cause of soft corners when shooting with a dome.
As an important aside, the key to overcoming blurred corners with a dome is to close the aperture hence increasing the depth of field and getting more of the curved virtual image in focus. A correctly positioned dome port is also important. If the lens is too close to the dome (a common problem) then the port acts more like a flat port and problems of refraction degrade image quality. Bigger domes also help. A large dome creates a virtual image that is further from the lens and less curved than a small dome, which reduces the blurriness of corners.
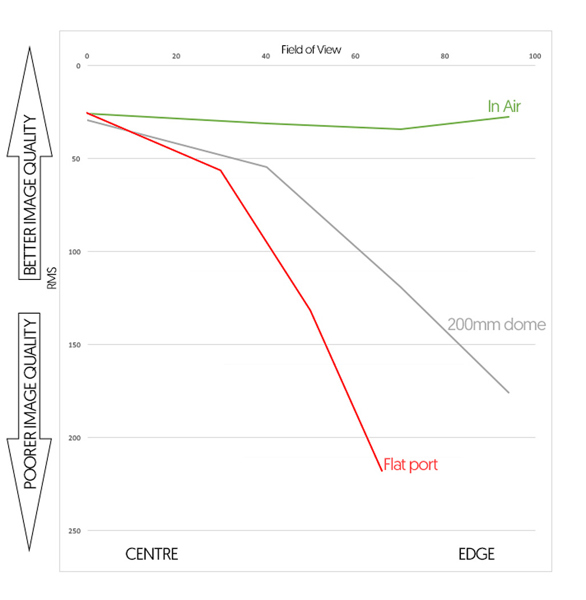
The graph shows image quality data from optical spot diagram simulations (using Zeemax software) at four points across the frame with a wide angle lens. The three lines represent the lens in air (green), in water behind a 200 mm dome (8”) (grey), and in water behind a flat port (red). In air the horizontal line shows that the lens maintains good image quality from the center to the edge of the frame. With the flat port, the image quality falls rapidly as the FOV increases, caused by the increasing refraction and the problems it brings. The dome port improves on the flat port, but image quality also drops away towards the edge of the frame because of the field curvature and other image aberrations. Before you sling your ports, remember that these tests are done with open apertures, so are a worse case scenario, especially for the dome.
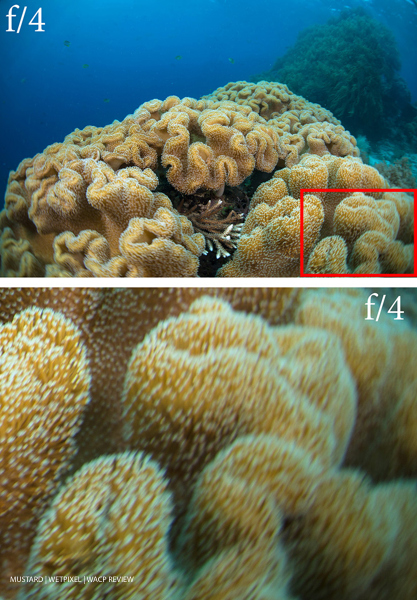
The take home messages are that ports are not perfect and the wider the lens sees, the harder it is to get good image quality into the corners of the frame. When using wider angle lenses, flat ports degrade image quality more than domes. Lenses with a FOV of more than 35˚ will show significant loss in quality towards the edge of the frame with a flat port. The popular 60 mm macro has a FOV of 40˚ on full frame and even this relatively long focal length lens shows issues in the corners of the frame (when detail is present), with loss of resolution and enhanced chromatic aberration. Be aware of this limitation when using lenses wider than a 60 mm with a flat port. While dome ports are better than flat ports, they still drop a lot of image quality towards the edge of the frame compared with the lens in air because of field curvature and other optical problems.
Fully corrected water contact optics overcome field curvature and the other optical problems of domes at all apertures, lifting the image quality much closer to how lenses perform on land.
DOME SIZE AND POSITION
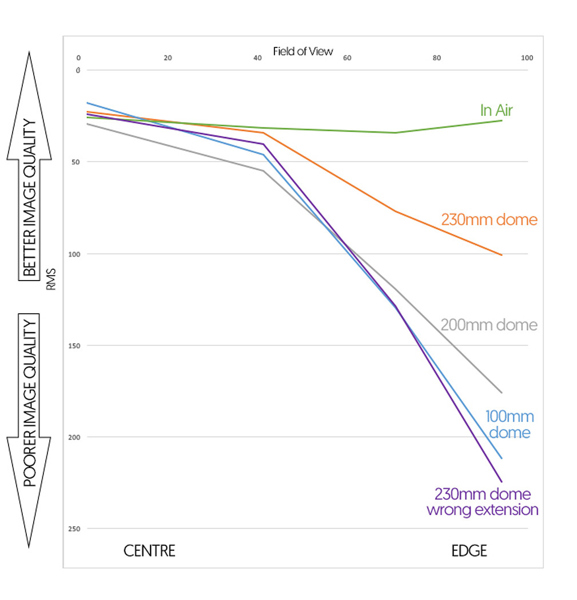
Before moving on, I want to add more data to the graph from the previous section, which is very valuable for improving our understanding of using dome ports. As far as I know, this is the first time anyone has probably collected and certainly presented test data of this kind for different domes.
The 100mm (4”) dome port performs slightly worse than the 200mm (8”), while the 230 mm (9”) performs considerably better. However, do note the data for a 230 mm dome that was not placed correctly, using a port extension just 3.8cm or 1.5” too short — something I see lots of people doing. Like this, the expensive 230 mm dome now drops as much image quality at the 100 mm. The graph shows that big, expensive domes deliver on image quality, however, they must be correctly positioned to do so. (Also note that all domes give good sharpness in the center of the picture, the advantage of bigger domes comes towards the edge of the frame.)
At this stage, perhaps the most important message is don’t panic. Just because your dome doesn’t achieve the theoretically perfect image quality, it won’t stop it or you taking nice pictures. It still works just as domes always have, which after all have been used to take almost every amazing underwater wide angle you’ve ever seen! And I should stress again that these tests use an open aperture and closing it reduces the problems of field curvature increases the image quality a dome produces considerably.
Page 1: Underwater optics issues and the WACP.
Page 2: How optics work underwater and dome ports.
Page 3: Water contact lens advantages and image results.
Page 4: Jason Isley’s comments, ocean images and conclusion.