Gates FX7/V1 housing for the Sony HDR-FX7 and HVR-V1U review
Field Test
Once I had the housing set up, I could finally fine tune the balance and handling for various shooting situations (day dives without lights, night dives with lights etc) (The Gates approach is ‘one size does not fit all’ and we configure housings for a users’ needs. This means that every configuration may be different buoyancy/trim and require adjustment to suit the user.) On my trip, I had all sorts of shooting environments, from coral reef to black sand ‘muck’ diving, from pelagic fish to pygmy seahorses (and smaller!) For general shooting, I decided to put on the tripod on and the external monitor recessed far forward for a barely negative neutral buoyancy. Balance was a bit more difficult. The controls are mostly on the left side of the housing and thus there is a tilt to the left. Fore aft balance was about right with the monitor but I’d imagine it’d be much different with other ports. The housing is quite positively buoyant with just the base stand alone, especially in my configuration of flat port without hydrophone, internal diopter and top handle. The ballast weight of 1.8 kg/4lbs makes is a little too negative for my taste, but then being very negative has its uses when shooting in slight current, especially when combined with the tripod. This housing is pretty big and thus buoyant, being the biggest of all the aluminum housings in the market for this camera. The space needed to accommodate the big FP970 battery, the extensive controls, the double flip filter/diopter and other options forced the designers to make space for it all. That, in effect, made it more difficult to find the right balance for the housing. The base stand, designed to take ballast weights and optional battery packs for lights and the Gates tripod adds to the overall bulky feel. I had a problem finding the best balance and handling.
(On the topic of buoyancy/trim we have other weights now for various configurations including using the tripod/lights. Furthermore, it’s important to note the Gates shell design allows the housing to go deep. Making it different to be smaller/lighter/etc would have tradeoffs to deep water capability.)
Being the housing with the most access to camera controls in the market, the choices do present the user with a very subjective and individual problem, memorization of the functions of each control. I’d already become quite familiar with the V1 and where the controls are placed on the camera. Familiarizing myself with the housing controls on the left side took more time than I expected. The ND filter control and dial for Exp and Focus were easy but the push buttons were more difficult due to the alignment requirements. The pins had to be aligned to the holes to work. The knobs can be easily misaligned when pulling controls out for the camera’s entry to the housing. Extra care is needed when repositioning the controls. The feedback of the spring-loaded knobs indicate if the controls are aligned or not. If aligned properly, the buttons would recess inward and rebound. However, they won’t press down if the pin is out of the hole. Quite a few times during the first few dives, I found myself frustrated when using Push Focus because it wouldn’t respond, then I’d finally remember that the pin had to be aligned. The tactile feedback of the buttons was easy to get accustomed to but that’s in tropical diving. Wearing thick gloves in colder water, the feedback may not be as telling.
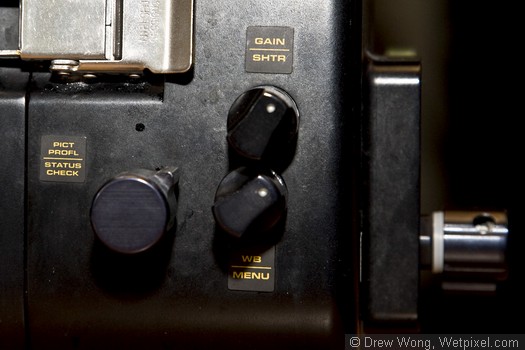
The rear bulkhead controls. Note the Gain/Shutter and WB/Menu controls require almost 180° turn to actuate the functions
Even when the controls became second nature on feedback, I still had to turn the housing to look at which function I wanted on the control, especially the A/M Focus/Expanded Focus control. The two holes require a minimal twist but you still have to align the the holes with the pin. Still all of the controls in the front left of the housing were within reach of my index finger or thumb and by the 13th dive, I had most of the controls memorized without having to double check myself. I just made sure to leave the knobs aligned to the functions I used most often. Not so were the rear left side controls where I had to release my left hand from the handles to use the dial knobs. Requiring almost 180° turns, you also need to look at the controls to know which end its on. With practice and habit, it’s not a big issue, but it’s not quick enough to change settings.
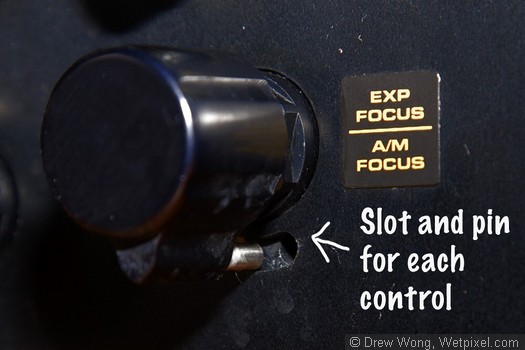
The pin/hole design requires the controls to be precisely aligned to operate the housing
The rear left controls require the entire left hand to actuate. The Shutter/Gain and White Balance/Menu knobs are quite intuitive and sensitive enough to rebound out after being actuated, which is a good thing since the camera can’t access other functions if one button is being depressed continuously. Changing the settings of those controls is done by a friction roller in the rear bulkhead. The rear bulkhead controls occasionally failed to work during the trip. I had difficulties with the SEL control as it wouldn’t grip the scroll wheel of the camera properly quite a few times and I had to press the control deeper to ensure grip, sometimes selecting a function or setting I didn’t want because of that. One of those times was due to sloppy preparation on my part. However, the screws on the camera tray, even though it comes with o-rings, can be loosened through vibrations from the skiff’s traveling at speed etc. I would test the housing in preparation for the dive and it would work. I’d then experience difficulty with the controls at the beginning and even during a dive.I especially had frequent difficulty with the Power switch, which had to be aligned properly to make sure it catches the camera power switch. Turning the knob in normal position sometimes did not power switch fully to camera mode. I would have to repeat it while looking through the window to ensure it’s properly aligned. Each time I fixed it during the dive (e.g. SEL button had to be pushed a little before turning).
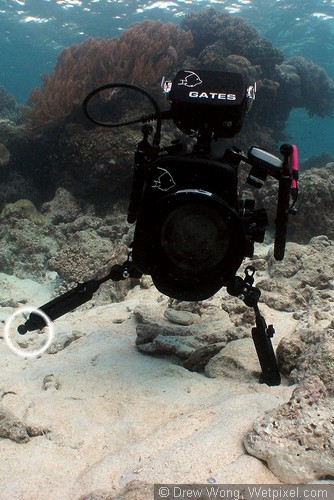
Note the right (circled) leg. The balance of the housing is left biased. It took some work to get it right.
The problem with mechanical housings are that they have to be precise to function properly. Sometimes, when the specs of the housing and camera, while still within their respective specs, but just wide apart enough to give trouble to alignment, it can manifest itself like it did for me. Many times the problem was also that the camera tray was not fastened down enough (shaken loose in transport) and there was some movement which caused the misalignment.
With the almost fixed length controls on the right for zoom and REC, there were no such problems. The REC lever worked every time and the zoom lever gave you good feel so you could control the speed of the zoom if needed. The URPro flip filter is in the right front of the housing and is easily flipped on or off.
To have all the camera functions at my control within a few pushes and twists of buttons allowed me to confidently shoot in many situations. The EM43 monitor made is very easy to frame and judge focus for macro shooting and even white balance. The 8 AA batteries meant I could shoot all day 5 dives a day and I never saw the low battery warning. I tested to see if it worked and after 5 hours into that test, it was suffice to say it would last a day of diving easily. The monitor hood was nice and deep, blocking light and preventing reflections in all but shallow water diving in bright sunlight. That is the one problem all external monitors have, the inability to handle the strong light reflections because of the glass chosen did not have anti-reflective materials. I was snorkeling a few times with cetaceans and could barely make out the picture if I were shooting down. Only when I freedived to about 5-7m and shoot level did the view become easily viewable again

The EM43 takes 8 AA batteries to give seriously long operating times
There are no controls for brightness and contrast for the monitor during the dive. There are adjustments inside the enclosure but once underwater, you’re stuck with the one setting.
With the problems in shallow water viewing in the monitor, it gave me a good chance to test the viewfinder, which had peaking and zebra information. However, because it’s not magnified (other than the water magnification of 25%), it proved pretty difficult to use it for anything but rough framing. I can focus and read text from 6” from my pupil, but I had problems pasting my mask on the viewfinder to see. The viewfinder was somewhat functional but the flat window prevented me from getting too close to the window (my nose was in the way too much). It wasn’t easy due to the lack of magnification. Gates does recommend using the expanded focus function to aid focus, which I did try once. It still wasn’t easy to judge focus. An easier way was setting the VF to black and white and Peaking to red to approximate focus. That was my best solution even thought it still wasn’t easy to see for my 20/15 eyes. Without magnification, the viewfinder isn’t a true viable alternative to the monitor. This would be especially so for hyperopia sufferers who’d have to back up enough to see properly, which makes the image even smaller.
I did try attaching a magnifying piece to the viewfinder internally. However, seeing how the camera out be lying outside where any sun rays peeking in would possibly fry the viewfinder LCD, I decided it wasn’t worth the effort try customization like that. Left alone, my magnifying modification in the viewfinder window may lead to LCD burn from the sun’s rays, a common occurrence in older housings from many manufacturers.
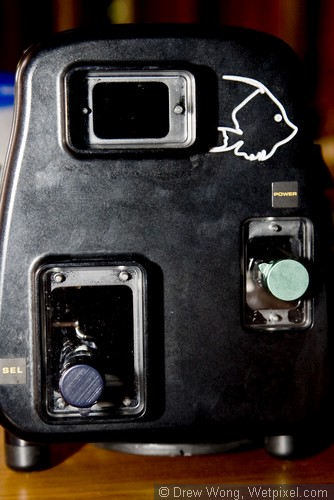
The rear bulkhead of the housing. Note the viewfinder window is almost flush with the bulkhead, making it difficult to move in close with a mask.
Since I only had the flat port, I experimented with several achromatic diopters. However due to the tighter fit of the flat port I could only fit the Raynox DC5320 +2 (it came with a +3.5 as well but that was too thick) and the older Century Optics AD5840 58mm size +4 diopter, which was designed for SD cameras. The both diopters dropped resolution down to about 600lph but still worked very well, especially the Century Optics which had slight less chromatic aberration and was crisper overall. Combined with the 20X lens, the +4 diopter could’ve isolated a pygmy seahorse’s upper torso full frame, but none of the fans I found the seahorses on were on the ground to set up the tripod. I also have the +7 which I didn’t test underwater because the shallow DOF would’ve made it impossible to get focus correct on a moving seahorse. I did use the camera’s Optical Image Stabilizer in Soft mode for a few shots and it worked ok.
The Gates tripod was fixed onto the housing on almost 40 dives. It was just negatively buoyant enough to counter the buoyancy of the housing with a monitor and FP970 battery installed. The overall buoyancy of the housing with tripod was probably 200-300g negative. which helped the housing’s handling. However, the real function of the tripod was to keep the housing steady and it worked well for wider shots where minute adjustments are not needed. It’s very easy to set up. ULCS clamps allow the legs to be turned without too much fuss. The length of each leg can be controlled by adjusting the knobs to lock it at the desired length, then merely check your framing in the monitor and make angle the adjustments by adjusting the length of the legs. It works very well for reef shots where the scuba noise would scare fish. Just set it up, leave it running, go away and come back.
However it does not replace a true adjustable head tripod in macro shooting. Minor and more precise adjustments are harder to make and the fixed plate means you cannot track a pygmy seahorse jumping from branch to branch. The weight is not at the base and in surge, the top heavy setup will move. A good tripod has the weight right at the feet for best stability. It does serve a great function for shooting off walls.
(I would note that the tripod was designed primarily for flexibility and to collapse tightly under the housing when not in use. It provides decent stability but not like a heavy, bottom weighted tripod.)
It does have another function. By turning the front two legs forward and extend the legs, you can cut down fore/aft and side to side motion, which leaves you to concentrate on the up/down motion for shooting macro on a wall. I tried this a few times and it worked quite well.
A little extra work is needed when it came time to change tape. I had to pull the 6 controls out of the left side, lift the REC arm on the right side, unscrew the tray and side-shift it out more than halfway before I could access the tape. Not a problem when diving from a liveboard but the extra time needed could mean valuable seconds in situations like baitballs, etc.