Gates FX7/V1 housing for the Sony HDR-FX7 and HVR-V1U review
Setting Up The Housing
Being able to customize the fit of a housing is important for a shooter to get the most out of the housing. The Gates allows for some fit personalization with its modular components and the adjustable handles and external monitor. The first thing to do with this housing is to decide on the lens port then choose the right fit at the bottom of the housing. Due to the setup I had, I choose to have the tripod attached because it was the most neutral setup for liveaboard diving. Putting it on the housing is simple - just unscrew the fastener on the bottom and slide out the four-leg base and reverse for the tripod.
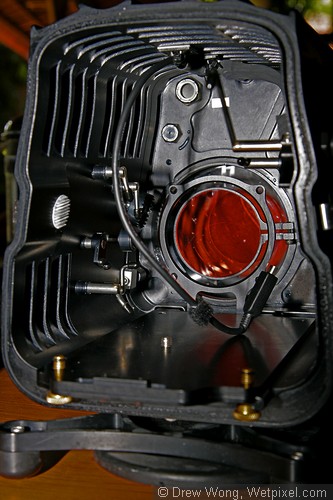
The interior of the housing. Note the fixtures at the back for the diopter arms and the tray assembly system
The camera is fitted with a teethed ring grip for the focus controls. Next was putting the camera into the housing, which is simple but not ‘straight’ forward. The removable tray uses a single 1/4-20 screw (which is not secured onto the tray and drops out!) for the camera mount. The tray is fastened by two screws which are aligned to the base of the housing by two groves. Before you install the camera into the housing, you must pull the control rods on the left of the housing out a little to make space for the camera to enter. The controls on the right of the housing cannot be pulled out. That is why the camera tray (with camera on) cannot slide in straight but has to be shifted to the left first then it slides into the slot. Hence the design of the tray with a moveable tray and sliding control rods on the left of the housing. A metal alignment frame at the front end of the slot aligns the front of the camera to the port opening. Basically if the camera front lens is in the hoop and the trays are aligned, you’re good to go.
(The reason for this alignment guide is important. It sets alignment for the camera with all ports but most notably with the Fathom SWP44B. Camera/port alignment is critical to get sharp, clear pictures. Even slight misalignment will quickly degrade image quality and introduce image ‘killers’ like distortion, vignetting, etc.)
After that you tighten the two base screws to secure the camera tray to the housing and reposition the control pins in their respective recesses to actuate the desired controls (eg. Pic Profile or Status). It is important to note that you should tighten the tray screws firmly (I’ll explain why later).
The two handles are fixed into two grooves on the top of the housing and can be positioned according to the reach of the user’s hands to the controls. For the left handle, all the controls on the left side of the housing were either forward of the housing or near the rear. The knobs controlling the Shutter/Gain and White Balance/Menu controls need to be turned almost 180° to choose between the two functions each knob operates. Merely using the thumb was not easy and to operate the control knob at the back. To use the buttons, one has let go of the left handle. The only time I’d use most of the settings at the back is when I’m not shooting (except for Shutter, especially in Progressive Scan mode shooting 30P) so the more crucial controls are in the forward area. I chose to set the left handle to allow me easy access to the controls up front. Securing the handle is simply done by tightening the screw once you have the handle in the position desired. The right handle is easier to decide on position as the two controls are nearer the rear of the housing.
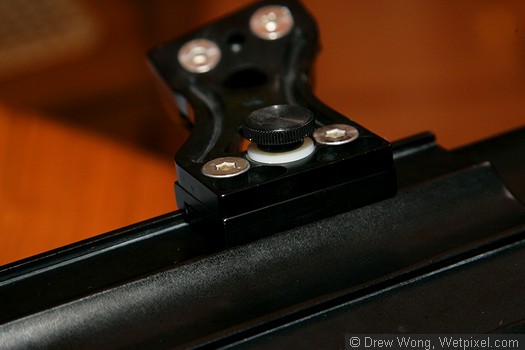
This is how the arm handles are secured to the housing body.
After connecting the component plugs for the EM43 monitor, closing the rear bulkhead is a matter of aligning it to the housing and snapping the two stainless steel latches on the side. Gates recommends you latch or open the two at the same time but I occasionally opened one side first with seemingly no detrimental effect. One should be careful opening the right latch. These latches have a strong rebound and the latch sometimes catches your fingers against either the record lever (which is why it’s a good idea to lift it out of the way before opening the latch) or the right handle ( this is because I set it close to the latch).
Now that the housing is set up, we have to set up the EM43 external monitor. The monitor uses the same latch system that secures the battery compartment at the rear. It uses 8 AA size batteries in 2 serialized holders of 4 batteries each. Simply load the batteries ( I used 8 2700mAH NiMH rechargeables for this test) and close the rear cover. Attaching the monitor on the housing however takes a bit of thought (especially for those who suffer hyperopia). The monitor enclosure is about 3lbs and is slightly negative neutral (~3 oz with your batteries), so it does affect the balance of the housing a little. With only the flat port to test, I pushed the monitor as far forward as possible to counter balance the front buoyancy. However, if the other lenses like the SWP44B were installed, the opposite would be done and then the issue of having the monitor too close to the diver’s eyes. Unless you have long arms and like to shoot with straight arms, the natural position is usually a slight bent relaxed arm. Pulling the monitor back and having the 25% water magnification may become a problem for hyperopia sufferers.
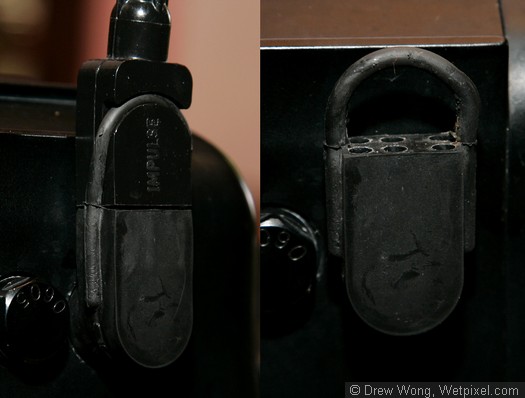
The wet connector for the EM43 is a 6 pin female with a rubber band fastener.
Plugging the monitor into the 6 pin female connector on the right front side is easy. Just push the male connectors in and then pull the rubber band to secure. I did try the connection without the rubber band for a few dives just to see if it would pop off and it worked except for one dive in current where the picture went to black and white until I pulled the rubber fastener on.