Shooting WA with multiple strobes - Clark Miller
Shooting Wide Angle with Multiple Strobes - By Clark Miller
Invariably, when I set my housing out for the first dive of a trip someone whom I don’t know will look down upon my setup and say, “Wow! Why so many strobes?”
For me it’s the difference between underwater photojournalism versus making art underwater. If you were to visit a professional underwater photographers pool studio you would immediately understand the importance in the placement of light sources. It applies both above and below the water. There is no one formula or magic setting to achieve the “best” lighting. It’s subjective, and underwater lighting changes continuously. In the wild we must carry out lighting studio with us, and the difficulty, given changing conditions, is far more challenging than in the studio. The balance between ambient and artificial lighting is at best fleeting. Sunny day, cloudy day, partially cloudy day with wind. Surface flat, surface choppy. Morning, mid-day, late afternoon. Blue water, green water and everything in between. Low water clarity versus blue water. Reflective subjects, light absorbing subjects, and combination of both. All these factors and more are what make up the artists palette, and learning to adapt our shooting to these conditions is a continuous challenge.
Controlling artificial lighting with ambient light is best achieved through the use of multiple strobes. It releases the constraints of a two strobe system by allowing certain types of lighting that would otherwise be impossible. Is it easy? No, at least not to start with, but once discovering the advantages of multiple lighting sources it will become nearly impossible to go back. Here are two examples to illustrate their use; the manta and a reef scene.
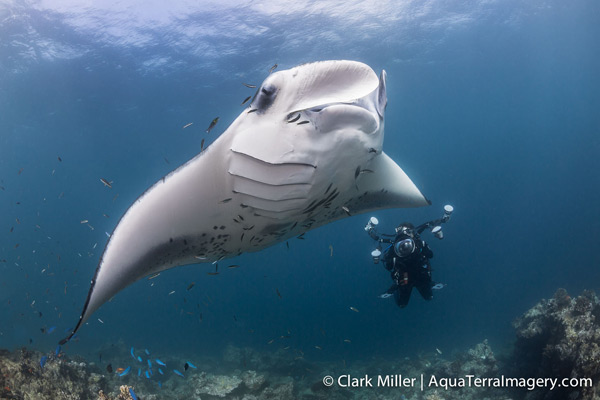
The Manta:
The technique used in this image is sometimes referred to as cross lighting in combination with up lighting. It is best achieved with the use of dome diffusers (which is a separate subject of its own). The manta shown here is photographed up close so the underside is in deep shadow. The diver in this image, professional photographer Adriana Basques, demonstrates the technique and positioning of the strobes I am using. The two lower Sea and Sea YS-D1’s are not pointed straight out. They are pulled back behind the port to eliminate dome flare, and turned up and out pointing toward the surface. Since the manta is nearly pure white and reflective, the settings are turned almost all the way down so the manta is touched with a small amount of light to reveal the definition of the manta’s lower underside. The top two strobes are higher and further apart, also pulled back. The right strobe is not pointing straight, but is turned ninety degrees and pointing slightly up to bring out the detail of the folds in the lobes, setting half power. The left strobe is also not pointing straight, it is turned out and away to lend volume to the shot. Both strobes are painting with the edges of the strobes to avoid blowing out the highlights of the subject, and also aids in reducing unwanted backscatter. The working edge of the strobes are more defined by the use of the dome diffusers, i.e., smaller hot spot in the center. The result is a balanced image that appears to have depth and volume without looking as if it had been artificially lit.
Reef Scene:
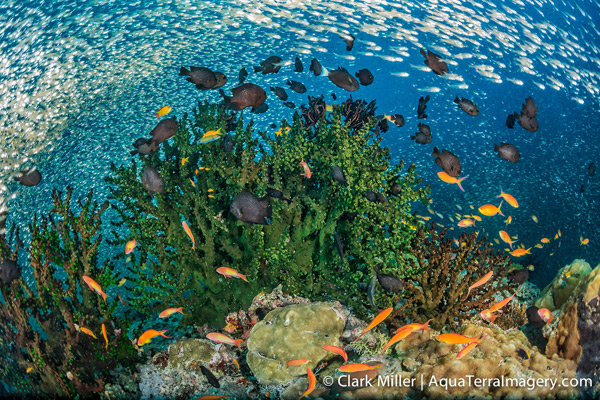
In order affectively light up an entire reef multiple strobes are used here to avoid both hot spots and dark areas. Again, the custom diffusers help to make this possible. The factors under consideration are foreground, background, and sides. Moving in close is paramount enabling the strobes to have sufficient reach to cover the entire area. For reefs there is no substitute for having lots of light. How to massage the light is what helps achieve the desired mood in the image. This is the art form. In this case the two lower strobes are pointed out and away. Since this is foreground the strobes are set to about quarter power. The left strobe is situated above the center of the dome pointing out and to the left at half power. The right strobe is stretched to the right and pointing slightly out at half power. The positioning of the strobes required several minor adjustments in the angle and distance to the targeted area in order to light the highly absorbent green coral, without blowing out the reflective silversides. The result is an image with considerable differences in the amount of light that hits each area of the subject, giving it the appearance of almost being three dimensional. The variation in light intensity and the direction of the beams causes this pleasant effect.
Summary:
Multiple strobes allow the photographer unlimited lighting potential, and greater artistic range. Important considerations are:
- Change settings for the desired amount of light hitting the subject. No one setting is best. Take many shots. If it’s worth shooting, spend the time to get it right rather than chasing all over the reef.
- Move the position of the strobes in order to achieve the best lighting for that particular area. Find out where the edges of the strobes are and learn to paint with them to give the best results.
- Moving the angle of the strobe ever so slightly can make a considerable difference in the look of the image.
- Think in terms of the angle of the light sources, and which part of beam is hitting the subject, where more or less light is needed, or where they cross and combine with the other strobes to bring greater depth. This is the most difficult part to get right.
- When in doubt point the camera rig toward the subject in the viewfinder, and then look over the top to see where the angles of the strobes are pointing and begin making adjustments. Experience and practice is the best teacher. It may seem overwhelming at first, but don’t give up.
These are all important components to building an image, and building an image is far more satisfactory then locking the arms in once position for the entire dive. Believe it or not it is one of the more common mistakes in underwater photography.
Confession:
I do not shoot much. I do not come back to the boat with a thousand images from a dive to edit, except under rare circumstances. I am very selective of what I shoot and when. I study my subject and try to predict behavior as best I can. I respect the environment and the marine life I am interacting with. I let go of my inhibitions and realize I am only a guest. As an artist I am never entirely satisfied with my images. There is always something that could have been done better. I like it that way. It’s the journey.
Strobe dome diffusers can be purchased here.