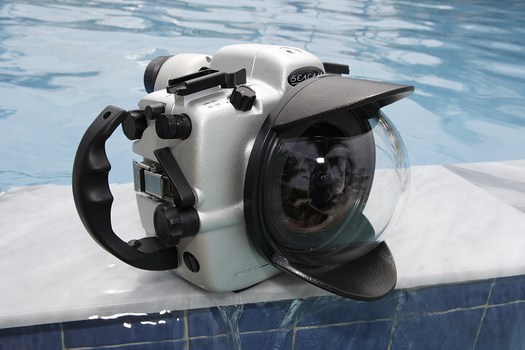
Seacam Nikon D2x Housing Field Report and Review
Text by Dennis Liberson
Photographs by Dennis Liberson and Stephen Frink
Shortly after Nikon announced its new flagship professional DSLR camera, the D2x, late last year, I pre-ordered one through my local camera dealer. I wanted a new, higher resolution DSLR to replace the Nikon D1x’s I had been using since that model was released in 2001.
The Nikon D2x has many attractive features, including a 12.4 megapixel DX size CMOS sensor, a brighter, enlarged viewfinder showing the entire frame area with a .86x magnification factor, a large 2.5 inch LCD, an Li-ion battery with longer life, improved auto-focus speed and accuracy, a maximum frame rate of 5 frames per second (and up to 8 fps using the high speed crop feature) and many user-customizable options that offer potential advantages when the camera is placed in a housing for underwater use.
Since receiving my Nikon D2x camera in early March, I’ve had ample opportunity to use the camera above the waterline and I have been pleased with its image quality and functionality. Like other underwater photographers who have purchased a D2x, I have eagerly awaited the arrival of a Seacam D2x housing so that I can use this fine camera underwater. Recently I had the opportunity to use one of the first Seacam D2x housings on a short four day trip to the Bahamas, courtesy of my friend, Stephen Frink. Here are my initial observations of this camera and housing combination.
Camera Menus
The Nikon D2x provides extensive user customizable menus. While the settings any photographer uses are a matter of personal preference, there are some settings I have found particularly useful for underwater use.
1. The “Shooting Menu” and the “Custom Setting Menu” permit the saving of four settings “Banks”. I have found it advantageous to name an “Underwater” Shooting Menu Bank and Custom Setting Bank to expedite setting up the camera for use in an underwater housing.
2. For outdoor photography with the D2x, I have found the Auto White Balance setting to be very effective. For underwater use, however, I have found it more effective to “dial-in” the white balance. In my “Underwater” Shooting Menu Bank I have saved a white balance setting of 5600° Kelvin.
3. I shoot in the NEF (raw) format almost exclusively and have saved this setting and a sharpening level of “Normal” in my Shooting Menu Bank. While I over-ride this sharpening setting in the raw conversion process, I have found it helpful to use this setting to better assess the sharpness and focus of an image using the camera LCD and zoom feature.
4. While I have not used this feature on the D2x, in an experiment with a previous Nikon digital camera model I found the Auto ISO feature to be a complete disaster. I set this setting to “OFF” for underwater use in the Custom Setting Bank.
5. So that my shooting speed is not faster than the recycle time of my strobes, I set my camera to “Continuous Low” mode (CL) for underwater use and in my “Underwater” Custom Setting Bank I have saved a shooting speed in the CL-mode of 3 frames per second.
6. I reverse the function of the “Command” and “Subcommand” dials in the Custom Setting menu since I find it easier to use my right thumb to change the aperture setting when necessary to control my strobe exposure. I also use the Custom Setting menu so that the aperture is adjusted by using the Command dial rather than the aperture ring on the lens.
7. In the Auto Focus menu in the Custom Setting menu, I set the Focus area select to “wrap” which makes it easier to move the focus area indicator.
This is not intended to be a complete discussion of the many menu settings available with the Nikon D2x. My objective here is only to point out some of the most useful menu settings for underwater use.
Setting up the Camera
Preparing the Nikon D2x camera for placement in the Seacam D2x housing will not be new territory for any photographer who has previously used a Seacam housing, but there are a few considerations unique to the D2x that were not present on camera and housing combinations for earlier Nikon “Pro” models.
1. Begin by removing the LCD cover from the camera. My experience is that it is impossible to avoid scratching the camera LCD when handling the camera with the cover removed, so I recommend covering all of the LCDs on the camera with “Hoodskins” by Hoodman. This clear thin material can be cut to fit the camera LCDs and can be used under the plastic LCD cover provided by Nikon (which easily falls off during normal use) and protects the LCDs from scratches when the plastic LCD cover has been removed or lost.
2. Remove the viewfinder eyepiece from the camera. With the Nikon D2x, Nikon added a locking eyepiece, so that the eyepiece would not fall off during transport or normal use. Unlock the viewfinder eyepiece by closing the eyepiece shutter with the eyepiece shutter lever and then unscrew the eyepiece from the viewfinder.
3. Turn the camera to the “Off” position.
4. Turn the Focus-mode Selector (the switch on the bottom left of the lens as you hold the camera to your eye) to the manual focus, or “M” position.
5. Place the Auto Focus-area mode selector (the switch on the rear of the camera to the right of the LCD as you hold the camera to your eye) in the “Dynamic area AF with closest subject priority” position (facing straight down).
6. Make sure that a charged battery has been installed in the camera body.
The camera is now ready to be placed in the housing. The Compact Flash card and a lens can be attached to the camera either before or after the camera has been placed in the housing.
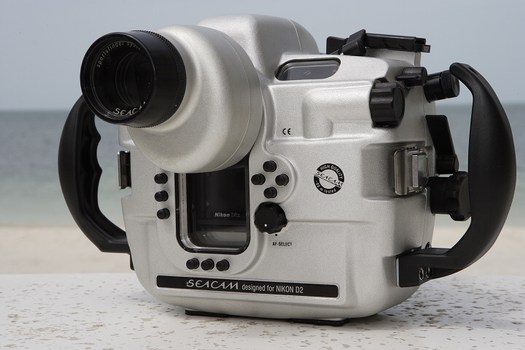
Setting up the Housing
1. Open the housing by opening the two stainless steel latches on the side of the housing and removing the back of the housing.
2. Clean and grease the main o-ring on the housing.
3. Now that the housing is open, remove the tripod screw from the tray at the bottom of the housing.
4. Turn the “On/Off” switch on the housing (top right) to the “Off” position by aligning the white dot on the switch with the black dot on the housing body.
5. After greasing the o-rings on the viewfinder and inserting a locking pin in the small hole above the viewfinder port, attach a viewfinder to the rear section of the housing. Place the retainer ring around the viewfinder on the inside of the housing, being careful that the entire ring is laying flat and tight around the viewfinder so the viewfinder is properly secured.
6. To set up the Auto Focus-area mode selector control on the back of the housing, align the white dot on the switch with the black dot on the hosing body.
7. To set up the Metering selector control on the housing, pull the control out several millimeters from the housing body.
8. Pull up on the Bracketing/Flash sync mode/Command lock control on the top of the housing so that it extends a couple of millimeters.
The housing is now ready for the camera to be placed in the housing.
Inserting the Camera into the Housing
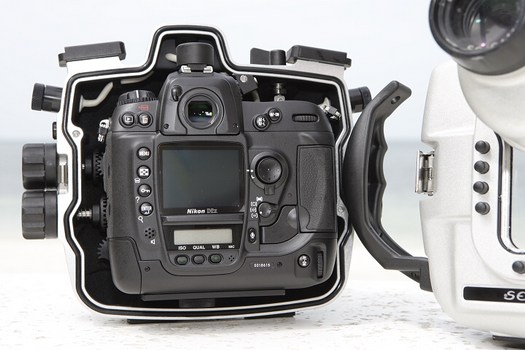
1. Carefully place the camera into the housing. It may be necessary to insert the camera at a slight angle so that the Focus-mode selector properly engages and the camera has room to clear the Metering selector control.
2. It may be necessary to slightly depress the spring loaded Metering selector control so that it can properly sit on the Metering selector switch on the camera. Rotate the Metering selector control on the housing so that the cut out on the control fits over the flange on the Metering selector switch on the camera.
3. Screw the tripod screw through the tray in the bottom of the camera housing into the camera.
4. Slide the strobe sync cord into the hot shoe on the top of the camera.
5. Place the rear section of the housing onto the front of the housing while insuring that the two black pins on the rear section are aligned with and slide into the holes on the front of the housing.
6. Close the two stainless steel latches on the sides of the housing.
7. Align the white dot on the Bracketing/Flash sync mode/Command lock control on the top of the housing with the black dot on the housing body and push in on the control.
8. Push in the Metering selector control on the housing to engage the control.
The housing is now ready to attach the lens port and strobes of your choice. Be careful to properly clean and grease the o-rings on the lens port (and extension ring, if one is used) and the strobe sync cords.
Observations
I have been using housed cameras for underwater photography since the early 1990s. I’ve shot with the Nikon 8008s, F5, D1x, and now, with the D2x. After using the Nikon D2x and Seacam underwater housing for a few days I can honestly say that this is the best camera and underwater housing combination I have ever used.
The engineering of the housing is superb. It is simple to install the camera in the housing. Just drop it in, tighten the mounting screw, close the housing and it is ready to shoot. No adjustments of any kind were necessary. Every switch on the camera was touched and every control worked perfectly.
One of the features of the Nikon D2x is that the buttons on the camera have been increased in size when compared with previous camera models. The fine engineering and craftsmanship of the Seacam housing and the oversized buttons on the Nikon D2x camera combine to deliver an amazing level of precision and functionality. My desire has always been to possess an underwater housing that allows me to use a camera the way I use it on land. The Seacam housing for the D2x fulfills this desire; every control is easily accessible and operates with ease.
As an example, seconds before a dive with the Tiger Sharks at Tiger Beach, darkening skies prompted me to increase my camera’s ISO setting to 200 ISO. With a single touch of the ISO button on the housing and a turn of the command dial the change was made. I jumped into the water and was able to maintain a shutter speed fast enough to stop the action of this fast moving Tiger Shark.

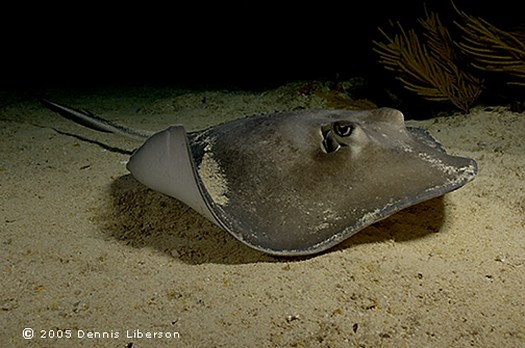
Several years ago when I switched to the Nikon D1x there was one aspect in which I was taking a step back; the viewfinder. This was a real challenge when manually focusing on small macro subjects, or any subject in reduced light or at night. Even with the Seacam S-180 Sport Finder I found it more of a challenge to compose and focus then I did using the Nikon F5 and Action Finder. But no longer will I miss my old Nikon film camera. The Nikon D2x with its larger, brighter viewfinder and the outstanding optical qualities of the Seacam S-180 Sport Finder combine for a giant leap forward. I can again compose and focus with tremendous accuracy, even in low light and at night.
The following images were taken during a night dive on the Sugar Wreck. With only the aiming light on my Ikelite 200 strobe (with diffuser attached), composition was easy.

The Nikon D2x has much improved Auto Focus capability, with improved speed and accuracy, even in low light. As I indicated earlier, I customized the frames per second rate (at 3 frames per second) for shooting in the Continuous Low mode, using the “Custom Setting Menu”, reducing the chance that my camera’s shooting speed is faster then my strobes’ ability to recycle. With the customizable frames per second rate and improved auto focus ability, the D2x is a great camera for shooting fast moving underwater action.
Here is a series of four images of Caribbean Reef Sharks captured over a duration of 1.3 seconds. The improved Auto Focus of the D2x and customizing the frames per second rate to stay within the recycling ability of my strobes allowed me to keep up with the movement of the sharks.

Image 1 Captured at 15:11:48.3
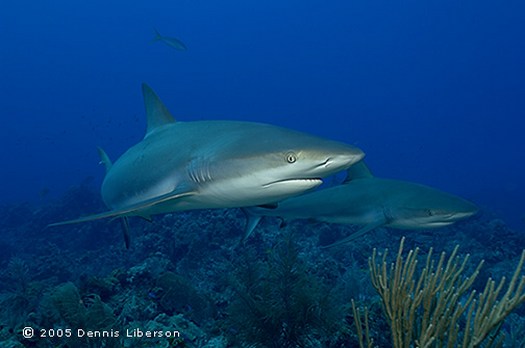
Image 2 Captured at 15:11:48.7

Image 3 Captured at 15:11:49.1
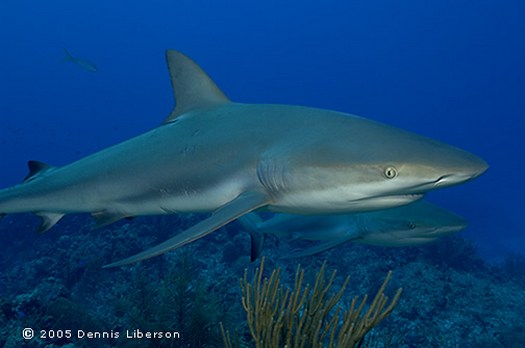
Image 4 Captured at 15:11:49.6
The large 2.5 inch LCD on the Nikon D2x and the large viewing window on the Seacam housing make reviewing images simple, even while in the water. The D2x has an improved zoom function that facilitates checking for sharpness. Exposures can be accurately assessed with the improved four channel histogram display on the D2x. Like all of the other controls, navigation is easy using the buttons on the Seacam housing. Even the camera menus are easy to read and navigate underwater.
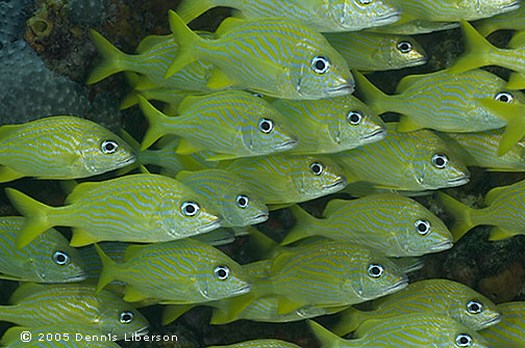
Reflective subjects like the French Grunts in the following image can be easy to over-expose. The easy to read four channel histogram display on the D2x and the large viewing window on the rear of the Seacam D2x housing make it easy to check and fine tune exposures.
Another great improvement on the Nikon D2x for underwater use is the new, longer life Li-ion battery. The battery on the Nikon D1x was an inconvenience for topside shooting but a real problem underwater. With its limited capacity and tendency to run down quickly and without notice, the battery on the D1x needed to be changed every dive, requiring removal of the camera body from the housing. The battery on the D2x is excellent. After a full day of shooting, my D2x had battery power to spare.
Knowing the amount of remaining battery power is a big plus when you are about to jump off of a boat and into the water. The D2x battery information can be checked in the “Set Up” menu which includes the percent of batter power remaining and the number of shots taken on the current charge, thereby eliminating guesswork about when to change and charge the battery. Again, this menu is accessible and can be easily navigated when the camera is in the Seacam housing.
Conclusion
After several days of underwater shooting with the Nikon D2x and Seacam D2x housing, I know that this will be a camera and housing that underwater photographers will use with great enthusiasm and results. The superior image quality, ergonomics and features of the Nikon D2x, combined with the outstanding engineering and quality of the Seacam housing, will likely lead to great underwater images. As you can tell, I’m very excited and looking forward to getting my own Seacam D2x housing soon.