Sea & Sea DX-D200 Underwater Housing for Nikon D200
Sea & Sea DX200 Review – Ergonomics and A Topside Look
INTRODUCTION
Nikon’s D200 digital SLR was eagerly awaited by many folks, myself included. Positioned neatly between the Nikon ubercamera D2X and the more amateur-grade (if not amateurish in performance) D70s, the D200 promises many of the bells and whistles of the high end pro body, while omitting just a few. Many reviewers talk of the D200 as the much-desired and wished for “digital F100”, and in many areas the D200 exceeds that venerable body’s capabilities. So it is no surprise that the D200 is probably the hottest thing going in the Nikon underwater dSLR world at the moment, and every major housing manufacturer has either announced, shipped or planning a housing for this body. As a one-time user of the F100 in a Sea & Sea housing, and with a collection of compatible ports to hand, I ordered the Sea & Sea DX-D200 housing as soon as it was announced. The purpose of this review is to go over some of the features and ergonomics of this housing, particularly from the perspective of someone who has used the older F100 housing by the same manufacturer.
Originally, I had planned to try shore diving with this housing to get a feel for underwater usability. Unfortunately, the closest accessible ocean to me looks just a bit scary at the moment, not to mention being rather cold, so this review covers topside observations and some ergonomics.

I’m sorry, I’m not going in there just now.
OUT OF THE BOX EXPERIENCE
The housing is supplied with a spare o-ring in addition to that shipped installed, a good size tube of Sea & Sea o-ring grease, an o-ring removal tool, a reasonably extensive manual in Japanese and English, and a lovely “Sea & Sea Underwater Camera Equipment” bumper sticker that is currently occupying pride of place on my truck. An Allen key (hex wrench) is included, required for removal of the handles from the main housing body.
CASTINGS AND CONSTRUCTION
Unlike the slightly-glossy paint finish of the F100/F5 housings, the D200 housing has a black, hammered-metal finish, first seen on Sea & Sea’s housing for the F/N80 film camera body. The F100/F5 housing finishes are annoyingly prone to chipping, and while it doesn’t affect the integrity of the housing, it tends to make one sad when the finish is marred. This hammered-metal finish looks quite robust and should handle knocks well. The housing is manufactured from cast aluminum, unlike the polycarbonate D100/D70 housings from the same manufacturer. The castings seem to be of high quality.
The handles mount to the sides of the front half of the housing with bolts and captive threads, and when fully tightened down there is no movement of the handle relative to the housing body. The two halves of the housing are joined by a pair of stainless steel clasps, these clasps are spring loaded and close with a satisfying click. Opening these clasps in a hurry when you fingers are wet can be quite painful, and it pays to be careful. Alignment of the two housing halves is aided by a pair of stabbing guides at the bottom corners.
Stabbing guides at the bottom of the front case guide the alignment of the two halves. The stabbing guide prong is visible through a small hole in the casting for the rear half of the housing when the housing is closed.
MOUNTING CAMERA AND LENSES
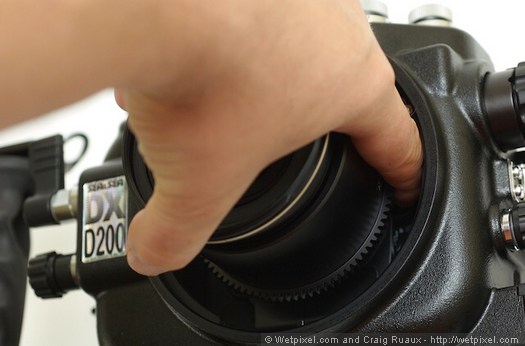
The camera body mounts on a saddle, this saddle incorporates the gears and actuator to control the M-S-C focus mode switch at the lower left of the camera body. Once the camera body is correctly aligned on the saddle, it slides into a locking mount in the front half of the body. You do need to be careful to have the camera power switch and housing power control aligned correctly, then everything just falls in to place. The housing is a very close fit to the camera body, the eyepiece surround and LCD cover both must be removed to allow the housing to close correctly. A standard style 5-pin hotshoe adaptor plugs in to the camera hotshoe.
The compact flash door is easily opened while the camera body is mounted to the front of the housing. The battery door, however, can not be opened with the camera in place. The USB, video and DC power ports on the left side of the camera body are accessible with the housing open.
With every new dSLR model there is usually a rash of “will the dXXX work in the so-and-so housing for the dYYY” questions posted on Wetpixel’s forums. Many users like the idea of a cheaper body as a back up, say a D70 or D100 as backup to a D200. In this light, I tried to mount a D70 into the DX200 housing, but to no avail. The D200 has a deeper grip and is slightly broader than the D70, and while the focal plane of the camera ends up in the right spot, the controls fail to align. I suppose if you were desperate you could rig a shutter release, but the control wheels and multi-control pad don’t look feasible, severely limiting the utility of a D70 body in this housing. If you want a back up, you’d better have two D200s.
The housing is remarkably compact, and if anything it feels slightly smaller than Sea & Sea’s F100 housing. With the fisheye dome mounted, the only thing oncoming tiger sharks will see are the handles! Even the flat port for lenses like the 60mm macro looks a bit big on this thing.
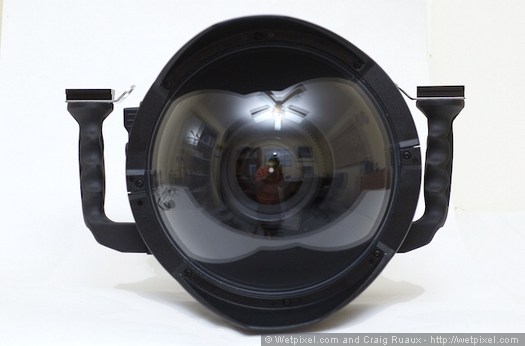
Behind the 9” fisheye dome, the housing essentially disappears.

Here the camera and 60mm macro lens are mounted, with the lens racked out to about a 1:3 reproduction ratio. With a couple of compact strobes, this system should work well for the macro fans.
The lens opening is reasonably substantial, with a front housing port diameter of about 120 mm (~4.7 inches), while the inner diameter of the ports is 98 mm (~3.85 inches). This is large enough to comfortably accept a reasonably broad lens, such as the 12-24 f4 AF-S zoom, with room to spare. In fact, I can comfortably reach around a lens like the 12-24 with an index finger and depress the lens release lever while the camera is mounted. The new AF-S 105 mm VR macro has a maximum diameter of 83 mm according to Nikon’s specifications, leaving a less-than-generous 7.5 mm clearance around the inside of the lens port. This may represent a problem for mounting manual focus rings with the current port system, but without a copy of this lens to hand I’ll have to leave that to others to try.
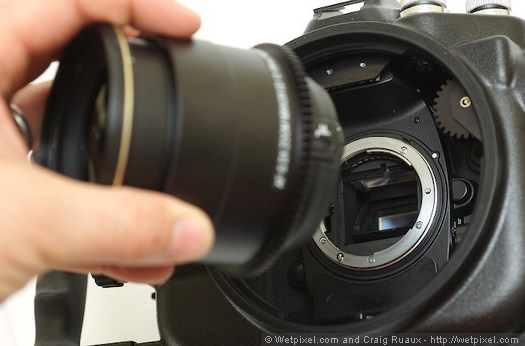
Access to mount lenses while the camera is in the housing is good. Here the 12-24 AF-S with accompanying zoom ring is being mounted. The gear to the upper right of the image actuates the zoom mechanism.
With the 60 mm macro or 12-24 AF-S lens mounted there is enough room for my reasonably large fingers to reach the lens release button. A lens with a more substantial girth, such as the new 105 AF-S VR, would be a tighter fit.
CONTROLS
If there’s one thing the digital revolution has brought us in abundance it is control wheels and buttons. While mounted in the DX200 housing the majority of the D200’s plethora of controls are accessible via mechanical linkages, with a couple of omissions mentioned below. The shutter release is actuated with a lever to the right of the housing, and the lever has sufficient tactile feedback to allow a half press to activate focusing. The AF on button has a dedicated, locking control, while AE/AF lock is operated via a lever above the shutter release. If you’re dextrous enough, you can compose, start AF with a half press of the shutter lever with your middle finger, hold down the AE/AF lock with your index finger, recompose then release the shutter.
The D200 uses a five-way control pad to navigate the menus and select AF points if you’re in an AF mode. This control pad has an additional function invoked by pushing the center of the pad, this is user selectable, with many users selecting a 100% view of the currently viewed image. The DX200 housing doesn’t have a dedicated button for this function, but pressing any two diametrically opposed buttons on the multiselector control panel achieves the same effect.
The full cluster of WB, QUAL and ISO is available with dedicated, locking controls, while each of the buttons on the camera’s left back has a dedicated button. The bracketing button control locks to allow one handed alterations to be made. From the right camera grip, dedicated controls are provided for exposure mode, exposure compensation, power and LCD illuminator and the metering mode selector.
The main and subcommand dials are controlled by knobs with friction buffers, with main command wheel at the upper rear right of the housing and subcommand at lower-front-right, beneath the shutter release lever.
In general, access to the controls is good. While admirably compact, there’s no avoiding that this is still a substantial housing, and the four way selector pad is just out of comfortable reach for me while keeping my right hand on the housing handle, and I have quite large hands. Some controls, particularly the front right controls for exposure compensation, exposure mode and the power switch, can be difficult to reach when the large fisheye dome is mounted with no extension ring.
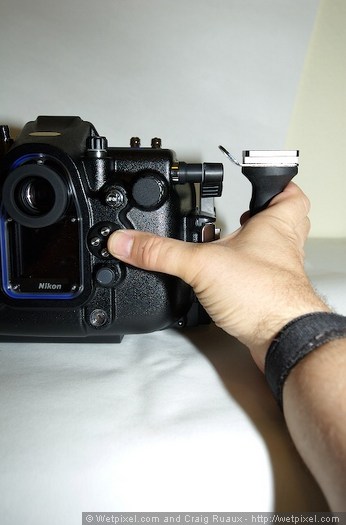
It’s quite a stretch, but just feasible to reach the multicontroller buttons while leaving my fingers on the right handle. I apologize for the relative paucity of dark gorilla hair on my arm, perhaps I need some Avacor Boost™ for next time.
VIEWFINDER, CAMERA INFORMATION AND LCD VIEWING
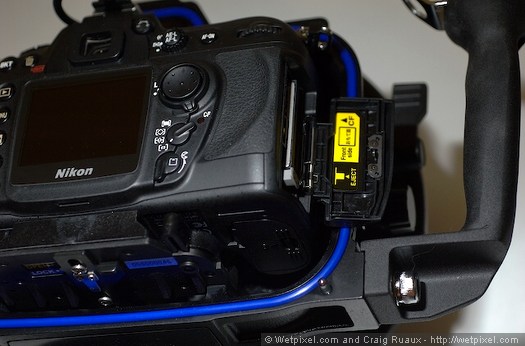
The stock viewfinder supplied with the housing is a 0.66x optic, which allows almost the entire viewfinder to be viewed at one time while wearing a mask; there is slight vignetting of the corners. Instructions for removal of the viewfinder are provided, and mention is made of an “optional finder unit” in the manual. To the best of my knowledge Sea & Sea is yet to announce any optional finders, but the prospect is tantalizing. The D200’s operating information is all displayed on a large LCD on the right upper surface of the camera, and the housing incorporates a large window that allows this LCD to be viewed. The viewing angle is slightly off square, but nothing is obscured. The real highlight of the D200 is the gorgeous, large, high resolution LCD screen for playback and viewing of histograms. The housing incorporates a large polycarbonate window that allows viewing of the LCD almost in its entirety. With the standard viewfinder in place the very upper edge of the LCD is obstructed, but when viewing the thumbnail plus RGB histograms, this is a minor inconvenience.
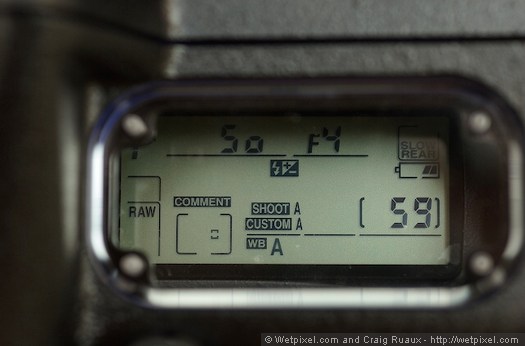
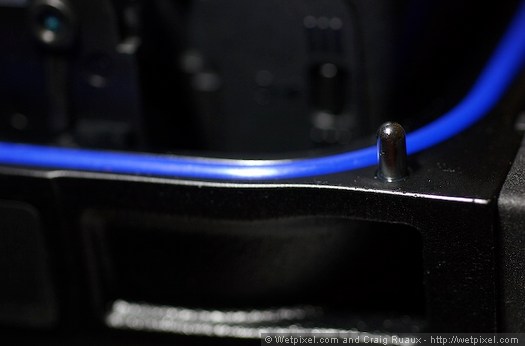
A large window allows viewing of the camera’s status indicator LCD
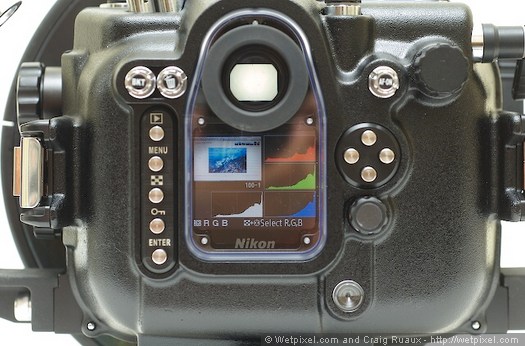
The stock viewfinder slightly obscures the upper edge of the LCD, otherwise the view of the LCD is very good. The thumbnail plus histograms view is very useful. The small round window at lower right is the leak alarm indicator, note also the visible stabbing guides at the bottom corners.
STROBE INTERFACES
The housing is provided with two nikonos style 5-pin bulkheads. The front bulkhead is wired with a standard 5-pin configuration, with strobe ready information provided to the camera. This bulkhead fires any strobe attached via a two- or five-pin sync cord. The rear bulkhead is wired differently, however, and is labeled for Sea & Sea’s upcoming iTTL converter unit (widely known to be an OEM’d version of the Heinrich’s TTL converter). While the pin configuration is the same in the base of the socket, I was unable to fire a strobe with a plain sync cord from this bulkhead. Thankfully, nothing exploded while carrying out this experiment…
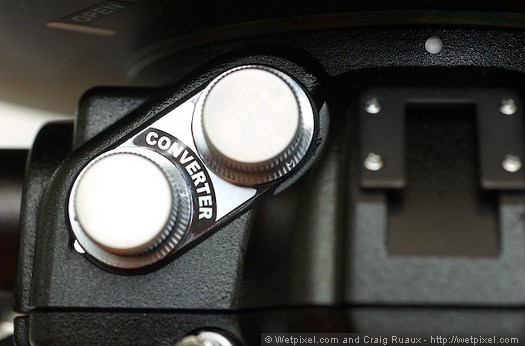
Strobe bulkheads. The rear of the two bulkheads is wired for the upcoming iTTL converter from Sea & Sea, and can not be used to fire a strobe with a plain sync cord in stock configuration.
WHAT IS MISSING, AND DO WE CARE?
One control that is inaccessible is the flash mode button, and thus you can not switch from front to rear sync nor vary the flash output compensation while the camera is in the housing. Flash output compensation can only work when there is two-way communication between camera body and strobe, so if you’re shooting strobes with manual control, you’re never going to use this control and instead you’ll simply adjust the strobe. Flash output compensation will be available via the iTTL controller module externally. For me, this is not an issue.
The control for the “motor drive” (now rather anachronistic, as nothing’s moving) is a wheel around the base of the ISO/QUAL/WB cluster. This control is also inaccessible in the DX200 housing. The same basic control was used in the F100 and was made accessible by Sea & Sea by screwing a plastic piece into the 10-pin accessory socket that held down the lock mechanism, then a friction wheel actuated the control. This looks like it should have been feasible in the DX200 housing, but has not been implemented. This means that there is no way to select the self-timer function. More importantly, there’s no way to turn off the self-timer function. Having previously done a dive or two with self-timer turned on, I can attest that this can be a real problem. Diver beware!
Neither of the DOF preview button or the FUNC button on the right side of the camera body are supported in this housing. I use both controls quite heavily topside. The FUNC button can be programmed by the user to invoke a wide variety of functions, I could see a 5 stop bracket burst being quite useful for wide angle shooters, and really would have liked to see this control supported.
Overall, this is a very solid, high quality housing. I expect to get many years of good use from this housing, and I am happy with the purchase. There are some things missing from this housing that may or may not represent a problem for individual users, but for photographers like myself with a reasonable investment in Sea & Sea ports, the decision to purchase this housing is basically a no-brainer.
Author: Craig Ruaux
—
For discussion about the Sea & Sea DX-D200 housing, see the Wetpixel forums:
[discussion 1] [discussion 2]