Review: Easydive Leo II housing
Review: Easydive Leo II PRO housing.
By Rico Besserdich.
During my last underwater photography workshop in Egypt, I had the opportunity to test the Leo II PRO Video housing for the Canon 7D, designed by the Italian housing manufacturer Easydive. During 5 full days of diving I shot around 3000 images and did some video, too.
Now, let’s have a look inside:
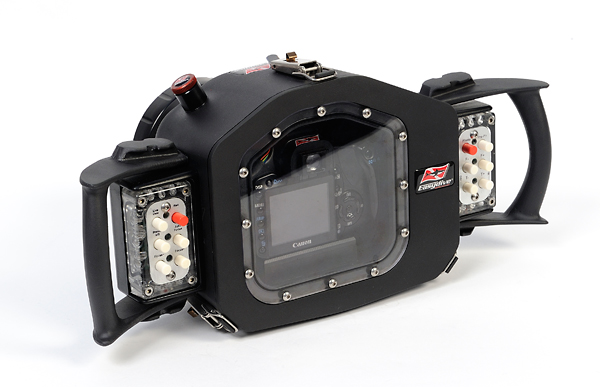
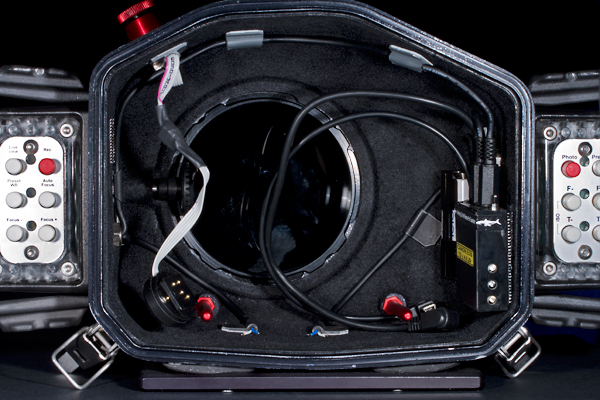
The only existing mechanical control of the Leo II is the zoom-control, everything else is triggered electronically by using the camera’s mini-USB port. The “heart” of the housing is a matchbox-sized electronic unit that connects the camera to button panels that you’ll find on the right and left hand sides of the housing (as a part of the housing’s grip).
In recent years, the major camera manufacturers have released at least one new camera model every year, producing a need to buy a new housing too because of differing sizes and button placements. Hence, the idea of accessing most camera functions electronically potentially produces the advantage of multiple camera support.
The Easydive Leo II supports all common camera models from Canon and Nikon. In simple words: One housing for all. This means that users can now upgrade to a newer camera without the need to buy a new housing too.
Supported cameras are (as of December 2012):
- Canon: 10D, 20D, 30D, 40D, 60D, 350D, 450D, 550D, 600D, 650D, 5D Mark II and III, 7D and 6D.
- Nikon: D40, D50, D60, D70, D80, D3000, D3100, D5000, D5100, D300, D300s, D90, D7000, D600, D700 and the D800.
If a Easydive housing owner wants to switch to a different camera, the only items needed to be replaced are the housing’s USB electronic box and the camera tray. This is sold as a bundle for around GBP 165 (200 EUR, 260 USD).
Of course, this is considerably cheaper than buying a new housing and multiple camera support is frequently cited as the main advantage of the Leo II. If the user wants to stick with their preferred camera brand but wants to upgrade to a newer model, there is no need to modify the electronics at all. The Canon and Nikon electronic packs recognize all Canon or Nikon cameras respectively. Firmware upgrades (such as the new firmware for the Canon 5D Mark III and the 7D which give access to additional camera controls) requires that the electronics be sent to Italy or to brought it to a show where the company is exhibiting. The upgrade can be performed in the field.
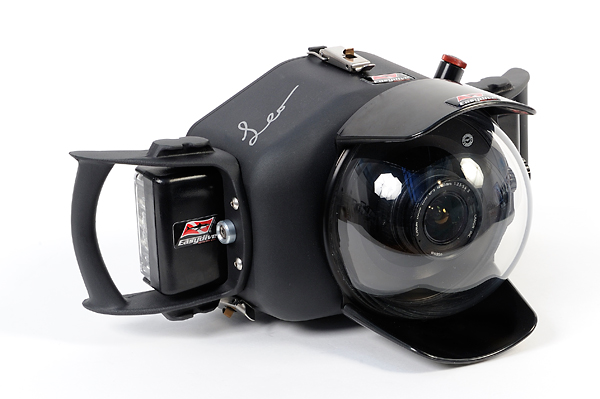
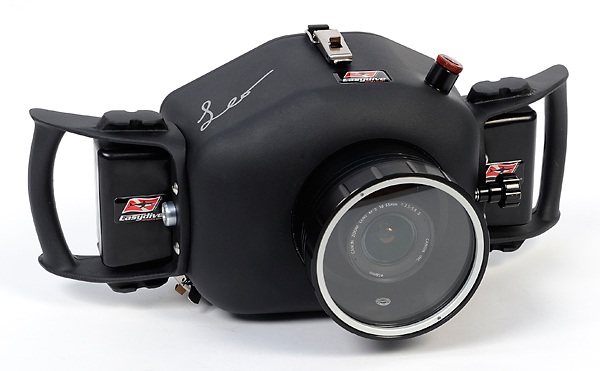
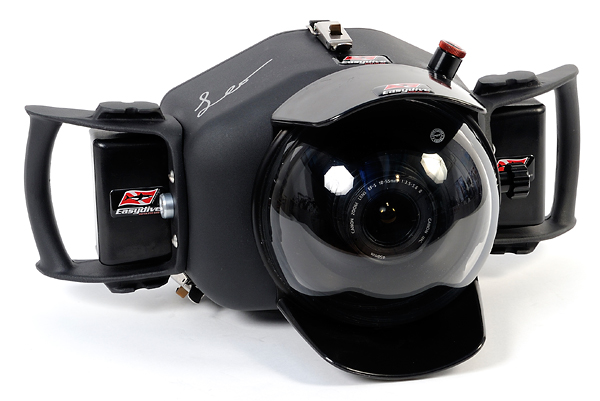
The housing itself comes in a pleasing round-shaped design (which is quite an attraction on the dive boat I have to say). It’s made out of 8mm thick marine grade aluminium and is depth-rated to 100 meters (150 meters or more on demand). The housing’s double o ring sealed backplate is held with 3 stainless-steel fastenings. For those who like to go to uunderwater photo dives without o rings, there is a leakage warning built-in too. It is a very solid unit and is designed for heavy duties, perhaps that is the reason why the Italian police and Navy are using Easydive housings for underwater photography and videography.
The molded grips each support 2 bayonet-style strobe arm connectors. This allows the connectionof either four strobes or 2 strobes and 2 video/photo lights (during my tests I’ve used two Sea & Sea YS-D1 strobes). Using Easydive’s own carbon strobe arms combined with their triple clamps a “4 leg“ tripod is easy to build as well, which may be useful for macro filming.
The single strobe connection bulkhead is a Nikonos 5/6 pin one (switchable). TTL functionality or fiber-optic strobe connection is not yet supported, but I have heard of a customized (by the manufacture) Leo II housing that provides strobe triggering through fiber-optic cables. Easydive will customize housings, and can provide additional bulkheads or remote connections for polecam shootings.
The standard version of the housing comes with a 6-button panel, allowing the user to access up to 10 camera functions (some buttons can be pressed together, acting as a kind of shortcut). The PRO version comes with two button panels giving access to more functions. I have used the so-called “Video Version“ of the housing where the right button panel controls the photo functions and the left panel the video functions of my 7D. The buttons themselves work magnetically.
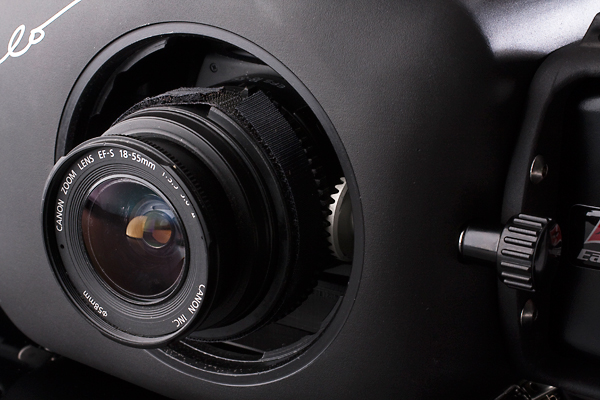
The housing’s port connector is a bayonet-style one; there are ports available for all commonly used lenses. The port diameter is 105mm which gives space for lenses (such as some SIGMA zoom lenses) that often do not fit into other housings and ports combinations.
Getting the Leo II ready for a dive:
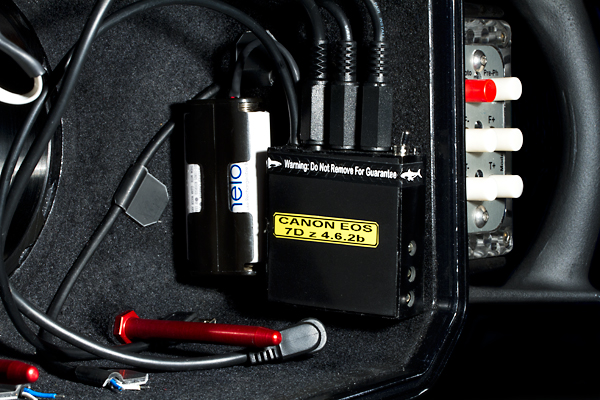
The housing’s USB electronics requires 2 AA size batteries (preferably Sanyo Eneloops) to run. The battery pack and the electronics unit itself are stored inside the housing but can be easily removed. Fully charged batteries last for up to 12 hours of operation (actually, during my tests they lasted 16 hours).
Mounting the camera on the tray is easy but requires a screwdriver not by using a coin or fingers.
Once the camera is mounted to the tray, there are 3 cables to connect to the camera: mini USB, remote control and strobe connector. This was easy and quick and the tray with the camera mounted slid into the housing.
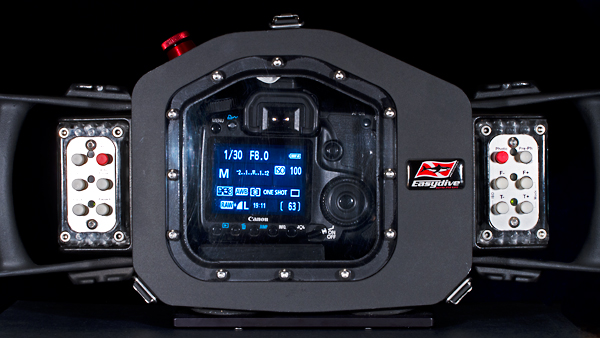
After switching the camera on, I activated the housing’s USB electronic, using its tiny switch. 3 LEDs indicate the status of the unit. A green light indicates that “everything is ready to go“ , a yellow light means “battery low“ and a red signifies that the unit is “out-of-order/malfunction“. The self-test takes only few seconds and the red light never blinked during my tests.
The same 3 control LED’s are mounted in the button units and can be monitored underwater.
As the housing does not have a top window to read the camera’s settings, it is advised to turn the camera on before going to dive, de-activate its “auto off“ function and set the camera’s LCD to “info“ so that it displays the camera’s settings such as ISO, aperture, shutter etc.
If you forget this step you would have to shoot blind. As there is no button to switch the camera on or off, it might be a good idea not to forget to switch the camera on before finally closing the housing and hopping in the water.
During my tests, I was out for diving for 8 hours every day and after returning to the hotel, the camera battery was still at 25%, enough to transfer all my pictures to the computer.
Some photographers prefer to shut down their cameras between dives to save battery charge. This require the housing to be opened. I did that too (being on a huge diveboat and a dry area) and, as the Leo II is self-drying within minutes, it wasn‘t really a big deal to open the housing inbetween my dives. Of course, doing this while sitting on a small RIB, rolling and yawing, in bad weather conditions, it would not be possible.
Mounting the backplate onto the housing was quick and easy as was mounting the port to the housing. The bayonet style port mount gives a good and safe feeling of “locked and tight“. When using zoom lenses (during my test I used a Tokina 10-17mm and a Sigma 10-20mm), assembling the zoom gear was easy but, as with all zoom gears, required a proper double-check. Better still, a triple check..or you may end up like me, wondering why the zoom is not working underwater.
A variety of flatports (some with manual focus control), extensions rings and domeports are also available. Easydive’s standard domeport (190mm diameter) worked well with my crop camera, however full-frame camera users would need a larger dome. Domeports are available as plastic (acrylic) and glass versions. There is also a mini-dome for CFWA shots available but I didn’t have it with me.
Shooting with the Leo II underwater:
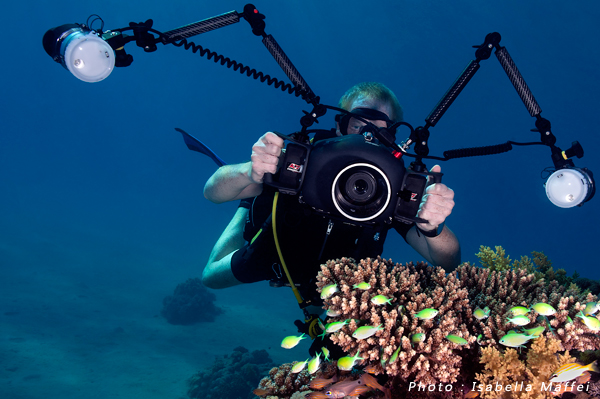
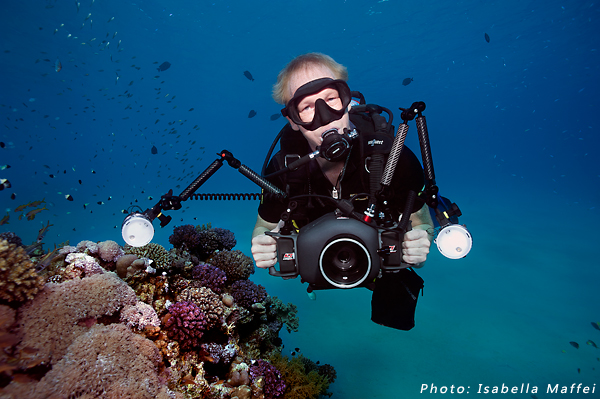
When set up for wide-angle photography (Tokina 10-17mm lens, domeport, Easydive carbon strobe-arms plus 2 SeaandSea YS-D1 strobes) the housing was neutral underwater. I would consider adding a small trim weight of around 100 to 200 grams, beneath the domeport, just to keep the housing stable in the horizontal position (with a domeport attached, the housing slightly tends to trim in a “nose up“ position).
I found the housing to be ergonomic and power-saving to use underwater and I never experienced any wrist ache. While swimming around and watching my students I’ve often held the housing with one finger. The 2 grips are very ergonomic and you just need your thumb(s) to access the control buttons and take your shots. Looking through the housings “viewfinder“ to take your first shot comes with a slight surprise: There is no viewfinder! The housing’s backplate holds 1 large polycarbonate window through which you look directly through the camera’s viewfinder. Although I was very suspicious of this to begin with, I have to say that it worked just great. Not as well compare with the magnified viewfinders supplied by SeaCam, Nauticam or Subal but sufficent for my needs.
For some camera models, Easydive also offers mini-viewfinders that replace the one of the camera, providing a larger field of view.
Although the “EasyFinder“ is not available for the Canon 7D I didn’t miss it.
I tend to shoot in full manual mode, so accessing shutter speed, aperture and ISO is basically all I need.
And this is the style of shooting that the Leo II is designed for. It took me only minutes to learn to use the housing “blindfolded“ as the buttons used to access shutter speed and aperture are easy to locate without looking at the button unit itself.
Changing ISO requires the pushing of two buttons at the same time, which sounds logical as I tend not to change the ISO for each shot I do.
Pressing the “photo“ button initiates focus and takes the shot. As I often work with half pressed shutter button on my camera, for composing pictures or just to follow shy marine animals with the autofocus, I was pleased to see that the housing provides a special “shortcut“ for this:
Pushing the “photo“ button for around 10 seconds changes its function: Whilst held in, it acts like a half-pressed shutter button and releasing it takes the shot. This comes handy with faster moving fishes. For non-moving subjects a second “Pre-Photo“ button exists. Once this is pressed, the camera focuses, calculates exposure and provides you with all nessessary information.
Changing shutter speed and aperture seems to work quickly, and I haven’t sensed any delay caused by the USB electronics. To review a pic after shooting it (I don’t do this after every shot, but sometimes I like to have a quick look) it is a good idea to set the camera to “display last image until any button is pressed“.
However this is only my personal preference. If you are used to reviewing all your pictures, while doing your safety dive stop, you might find it disappointing that such an option is not provided by this housing. It cannot be included as it is not integrated into the camera’s remote-controllable operations.
The PRO version of the housing comes with 6 more buttons on the left side.
Which camera functions cab be accessed through those buttons depends simply on the USB protocol of the camera and on what you choose. The USB unit of the housing is programmable (by the manufacturer) which gives customers the opportunity to create their own ideal setup. There is a list of accessible camera controls (depending on camera model) and you can choose which function you would like to access with which button.
The USB protocol of Nikon is a bit better than the one of Canon.
For Nikon, focus point selection works with the Leo II, but regrettably it is not for Canon.
Despite the disadvantage of not being able to change the autofocus points of my 7D (often I had it set to middle focus spot only), I’ve found the housing easy and ergonomic to use while shooting underwater.
Shooting video:
I am not a videographer but as I was supplied with the “Video“ version of the housing, I used the opportunity to shoot some video. The left button panel of the housing accesses the video functions of the camera.
Life View on/off, recording on/off, white balance (via presets), autofocus and manual focus controls are provided. The right side button panel provides magnification and ISO control when shooting in video mode. I’ve shot around 40 minutes of video in several takes and haven’t spotted any problems. For a short while I even gave my camera to one of my workshop students (while underwater) and she shot some videos without knowing the housing and without knowing my camera. I think that’s proof enough that it is really easy with Easydive ;-)
After the dive:
Due to its special paint the Leo II is almost “self-drying“. I found that just a few minutes after the dive a small (very small) towel was enough to get rid of last remaining water drops and open the housing safely. As there are no mechanical controls there is also less risk of water drops damaging your camera after opening the housing.
Taking the camera out of the housing was as easy as putting it in. After I got used to the housing it usually took me 10 minutes to assemble the unit and 3 minutes to completely disassemble it.
Conclusion:
The Easydive Leo II PRO is a well-designed and high quality housing for the advanced underwater photographer, who wishes to easily access the important functions of his/her camera underwater.
I find that newer generation SLRs come with an overwhelming bunch of functions and buttons, some of which can be confusing. What makes the shot is still the eye of the photograper, and his/her shutter speed, aperture and ISO settings.
Easydive housing add several functions, however Leo II can’t access all the settings on your camera. It never will. So, if you prefer to play with buttons, wheels and magic sticks and spen time accessing every single control and function of your camera, then this might be not the right housing for you. The question is revolves around what do you need to take a picture that you like ? This is simply a question of personal preferences. I like to keep things simple while shooting and working with a housing that provides me only the controls I really need worked pretty well for me.
The housing I’ve tested came with the standard “plain“ backplate but for those photographers who prefer to access more camera controls via mechanical buttons, customized backplates with these are available as extra accessories by request.
Having one housing that can host several different cameras comes very handy and cost-effective. USB electronics and therefore the customized controls represent a value which speaks for itself. For Canon cameras it would be nice to have te ability to select the focus points/areas in future and maybe a single switch on the housing for switching the camera on/off would be pleasing as well.
Pros:
- Multiple camera support.
- Easy to use.
- Very well made solid quality.
- Elegant design.
- Lots of optional accessories.
- Large port diameter.
- Customizable electronic and button functions.
- Quad strobe-arm support.
- Very low upgrade costs.
Cons:
- No camera on/off switch.
- No option of focus point selection (Canon only).
- Not all camera controls accessible.
FTC Disclosure/acknowledgments.
Rico works as an advisor for Easydive. He is not paid for this by the company although they supply him with equipment for his reviews and photography at no charge. In addition, his name is used in their marketing.
About the author:
Rico is a professional underwater photographer, artist and journalist. He has been involved in photography since 1978 and became specialised in underwater photography in 2001. His work is published in various magazines world-wide. In his hometown of Izmir, Rico leads the underwater photography department at the Fine Arts Photography Society and does lectures at the university Fine Arts Faculty from time to time.
In addition, he is co-editor of the “Edition Fifty Fathoms“ underwater photography artbook collection, author of the “creative uw photography and composition“ series in the German magazine “Divemaster“, contest judge and Photography Editor of the Australian magazine “72andrising“.
To see more of Rico’s work, please visit his facebook page, his facebook fan page and his own website.