Review: Dive and See DNC-5 underwater monitor
Underwater photographers and videographers have, like their surface colleagues, found that using the SLR’s LCD screen to gauge focus and composition can be a frustrating experience, especially with the sun behind you. For the SLR user filming topside, there are several external monitors available that enable you to see and focus on your subject. These can also be moved to different positions, either on the hot shoe of the camera or off-camera depending upon the length of the HDMI cable you are using. The underwater shooter doesn’t have the convenience of being able to place an external monitor 5 feet away or under a sun hood.
Fortunately, Dive and See, a Torrance, CA. based company, in common with several other manufacturers has come up with a feature rich external monitor that can be mounted upon most underwater housings for many of today’s more popular SLRs.

Let’s take a look at some of its features before moving on to installation and use. The first thing I noticed about the Dive and See monitor were the 5 LEDs on the back of the unit. It is one thing to have to recharge or switch out a battery on dry land, but a whole different ballgame when under water. A small push button next to the LEDs tells you just how much charge there is left on the monitor giving you plenty of notice between dives should a recharge be necessary. For testing purposes, I brought the monitor down to a complete discharge, plugged in the charger, and the monitor was fully charged within the hour. Once fully recharged, the charger cuts off automatically which is a feature common to higher quality charging systems found today. The charger itself is the typical power cord to AC adaptor to wall outlet that we are used to, but it is also capable of 100V-240V input making plugging it in to power outlets in a number of other countries without risk to the monitor or the charger.
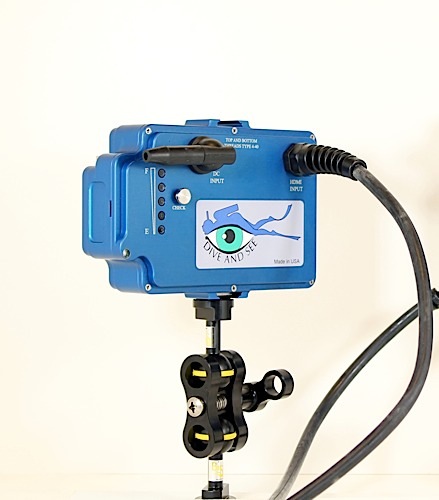
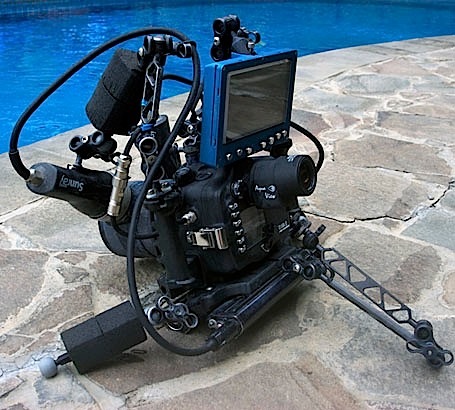
Another of my first impressions is the solid feel that you get when holding the Dive & See monitor. It has a sturdy and heavy heft to it that I feel is an assurance that this it will stand up to constant and heavy use without suffering from the sands of time. The monitor is sealed and cannot be taken apart or opened and the same applies to the HDMI cable that is attached to the back of the monitor. The monitor also has a cold shoe on its top which is useful if you want to attach a light or even an external microphone when using it for topside filming. The only negative is the heavy duty rubber protector for the HDMI connector which protrudes about 2 inches from the back of the monitor before the cable. You shouldn’t bend the protector, so this makes packing the unit slightly problematic should room in your case be a concern. The monitor is 6” x 4.25” x 2” thick but you need to add an extra 2.5” to its thickness to allow for the cable protector. This is a minor concern for me as I would rather have the extra protection for the cable when traveling with the unit.

There are 7 solid metal buttons along the bottom front of the monitor. From left to right, the first is the power button which turns the monitor on and off. Next is the scaling button which will allow you to adjust the ratio of your video display should your SLR LCD screen not use the entirety of its screen. With the scaling button you can adjust the display to either full screen, 16x9(my preference) or 3:2 Full. Since full screen does not display your entire composition as you are seeing it, I would advise one to avoid it. Better to have a smaller but more accurate image when setting composition than not.
All good monitors should have a peaking display and Dive and See doesn’t let you down on that score. This function, which can be turned on or off when under water, allows you to see just what elements in your composition are in or out of focus. When using the peaking button, the image reverts to a black and white composition and denotes those edges which are most sharply focused with a red colour. If left on during record, not to worry, as you will still be filming in the proper colour space.
The 3rd from the right button on the Dive and See DNC-5” monitor is also the most feature laden: The Menu button. This button has two buttons activated by the menu, one arrow button on the left and one on the right. Using these enables you to adjust a variety of screen appearances in terms of contrast, brightness, hue, saturation, and sharpness. In truth, once set up and connected to a Canon 7D, I saw no need to change any of the default settings for any of them. Also in the menu choices are 3 user presets that you can use to set adjustments to hue and colour saturation if needed. I like this idea as different shooting environments and day and night times can present vastly different appearances. Reverting to a preset provides an immediate viewing change and saves time having to make adjustments when under water. The menu also offers you the ability to have two different guide lines on screen. These can be very helpful underwater when trying to set a horizon with surge and current fighting you the entire time.
There is also a Blue Gun feature which enable you to use SMPTE colour bars to insure the colour accuracy of the image you are getting. When in this mode, only the blue component of your image is used and the green and red is turned off. Unless you are experienced with properly calibrating monitors, you might want to use this feature with some caution or avoid it altogether.
The last button draws a slightly critical comment from me. It is the Ratio/Exit button which allows you to quickly switch between a 4:3 and Full aspect ratio. For one thing, does anyone really shoot in 4:3 anymore? And since the Dive and See’s own Scaling button pretty much allows you to switch between viewing modes, this additional Ratio button seems to me to be completely redundant. I would much rather have had a Pixel to Pixel button in place of it which would be an even greater aid in determining absolute focus.
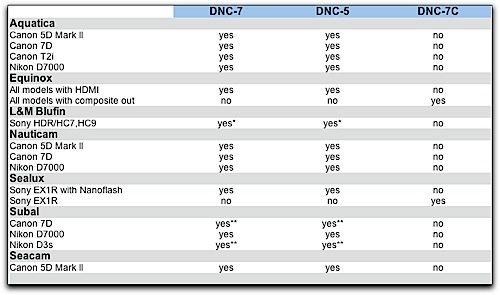
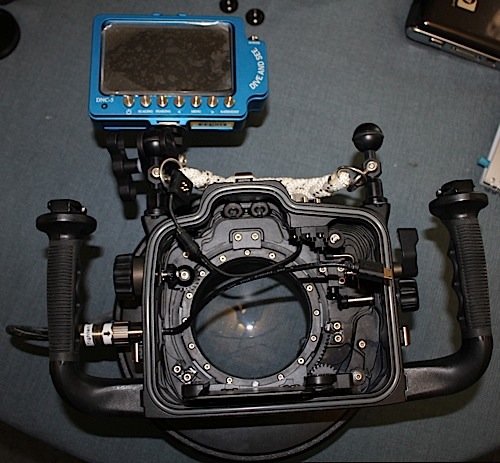
While Dive and See distributes a few different models of monitors, I only worked with the DNC-5” monitor and Nauticam Housing, however, as seen below, the DNC-5” monitor can be fitted to several different SLRs as well as several underwater housing manufacturers.
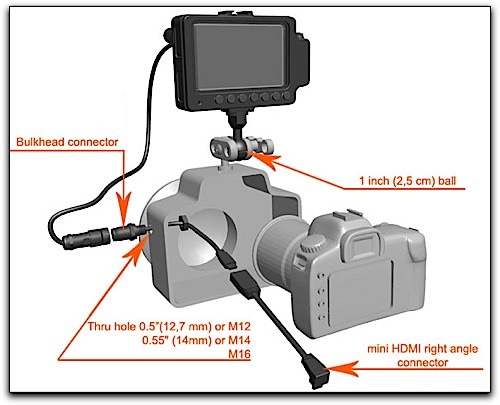
Installation of the DNC-5” monitor required a cable coming from the monitor to be threaded into the bulkhead of my Nauticam housing. Fortunately, the housing offered a couple of different placements for this and I chose to have it installed in the lower left of the housing. This same flexibility of placement applies to many SLR or camcorder housings.

A ball adapter allows you to place the monitor on top of the housing, which lets you move the monitor’s position to make viewing easier. No longer does the diver have to get as low as possible in order to see the DSLR’s LCD screen through the back of the housing. This is the greatest advantage to using this monitor; you can position it almost any way you find comfortable.
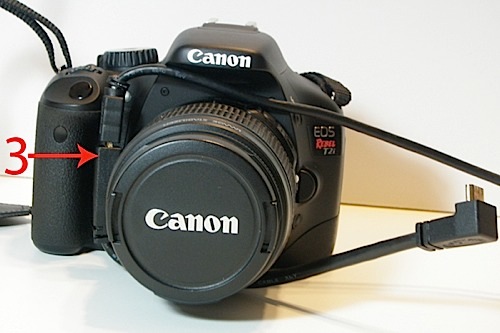
From the external HDMI connector to the interior of the housing, another HDMI cable must be then attached to the camera itself.
I was using a Tokina 10-17 lens with my Canon 7D. This presented a problematic issue. The supplied short cable within the housing that connects from the external cable to the camera’s HDMI input had to be threaded very carefully around the housing and camera before being connected into the 7D’s HDMI input. 22 here
There is not much room to do this and I found it a challenging. I ended up nervously holding the camera in one hand, barely out of the housing, while simultaneously trying to thread the cable with the other hand whilst also trying to fit the HDMI cable into the camera. I would suggest that this is completed on land not on a dive boat.

HDMI cables are available with swivelling heads and, if I had one, that might have made installation quite a bit easier.

However, once this process was completed, I was good to go, though I kept in mind that any time I switched cards or batteries I would have to repeat the setup process again.
On a dive boat, there is far too much water and spray about to risk getting even a single drop of salt water either in the housing or on the camera, thus making switching out a card or battery on the dive deck or camera table a risky proposition. It would be much safer for one to completely dry off after a dive and bring the housing and monitor inside a safe environment before changing out batteries. The only problem with this method is that, on liveaboard boats, the salons are often air conditioned which can cause a condensation problem once you bring the system back out into the open air, so allow plenty of time for the camera system and housing to acclimate, once again, to the outdoor atmosphere.
There are other underwater monitors, primarily for SLRs, available. Some that I have seen are powered by AA batteries stored in the housing, whilst other run off camera batteries. To change either of them, you have to open the monitor’s housing. This means that the monitor’s housing must have its own sealing 0-rings and latches. This creates an additional potential leak point. I love that the Dive and See monitor is completely self-contained, making worry over a monitor flood completely unnecessary. With the Dive and Sea monitors, concerns about opening and sealing the monitor housing are a thing of the past.
My bottom line is that, whilst the Dive and See DNC-5” monitor is not inexpensive, for the pro or semi pro videographer or photographer using a DSLR, having such a well crafted external monitor whose LCD screen boasts an 800x480 resolution, and is backed by an abundance of monitor features and choices, becomes almost a necessity for underwater filming. The build quality is as good as it gets, and the image seen through the screen permits a much more comfortable and pragmatic filming experience.
The Dive and See DNC 5” monitor retails at $2,149.00. For more information, please see the manufacturers website. It is supplied with a 1 year parts and labour warranty.
FTTC Disclaimer: The monitor was given to the reviewer free of charge for review purposes.
About the author:Steve Douglas is a certified Apple Pro for Final Cut Pro 7 and underwater videographer. A writer and reviewer for the kenstone.net and lafcpug.org editing websites, Steve was a winner of the 1999 Pacific Coast Underwater Film Competition, 2003 IVIE competition, 2004 Los Angeles Underwater Photographic competition, and the prestigious 2005 International Beneath the Sea Film Competition, where he also won the Stan Waterman Award for Excellence in Underwater Videography and ‘Diver of the Year’, Steve was a safety diver on the feature film “The Deep Blue Sea”, contributed footage to the Seaworld Park’s Atlantis production, and productions for National Geographic and the History channels.
Steve was a feature writer for Asian Diver Magazine and is one of the founding organisers of the San Diego UnderSea Film Exhibition. He is available for both private and group seminars for Final Cut Pro and leads underwater filming expeditions and African safaris with upcoming excursions to Bali, Raja Ampat, Indonesia, and the Maldives Islands. Feel free to contact him if you are interested in joining Steve on any of these exciting trips.