Nikon D2x Hotshoe syndrome and fix
[While this report was written with Seacam housings in mind, the issue and fix apply to all housings for the Nikon D2x. -Editor]
There have been some reports of a mysterious D2X syndrome whereby photos would inexplicably go missing. Apparently it only happened underwater, and the situation was that an image would shoot, appear on the LCD, but never write to the CF card. Wetpixel readers will have seen posts relating to the issue.
For Seacam users, there is an easy fix. First, look at the hotshoe connector. While it may seem obvious, we’ll take this as a chance to remind users that the hotshoe cord has a small O-ring attached. This is ONLY to hold it in place while the housing is in transit. It attaches o the registration post to keep the hotshoe cord from flopping about and serves no other function. Remove before using on camera.
More significantly, the pins on a Seacam hotshoe are designed to easily pull out or reinstall, without the use of tools (or a solder gun). I have addressed this previously in the Canon 1Ds Field Journal as follows:
VI. TTL Strobe Photography with the Canon EOS1Ds Camera -The submersible strobes you have been using with your Nikonos or other housed cameras will not fire in TTL with the EOS1Ds. In fact, they may not work at all. I’ve tried an Ikelite 200 and standard TTL cord for example, and with it attached the EOS1Ds would not even fire. It will work with a manual synch cord, however.
Since the old manual synch cords are hard to come by from any manufacturer, Seacam has created a clever way to customize the housing’s hot shoe utilizing user removable pins. The housing comes with 5 brass pins installed to contact the five pins on the camera’s hot shoe. This configuration is for E-TTL with the Canon speedlight and the Seacam Systemflash, and may be utilized by other amphibious strobe designers. But, with no tools required—simply pull out the pin with your fingernails—you can choose the contacts that will work with your strobe. You CAN reinsert he pins later if you chose, again with no tools required. I find the easiest way is to push the pin back into place, and then use the tip of a bent paperclip to push it farther into the hole, once. This will reset the pin and it will be exactly like it was when it came from the factory.
Please note, it is not necessary to open the hotshoe connector and cut wires or change the wire routing.
Harald Hordosch of Seacam Austria makes the following recommendation for pin removal, based on our pin illustration below.
Removing on the hot shoe:
1 = is working on most of the flashes—HARTENBERGER, SUBTRONIC…
1+ 4 = trigger / ready light is working—this is the safer way especially working with 2 flashes.
To be very safe check on the 2 side that only brown / red is connected. If more wires are connected please cut them. We are wiring in this way as standard from now.
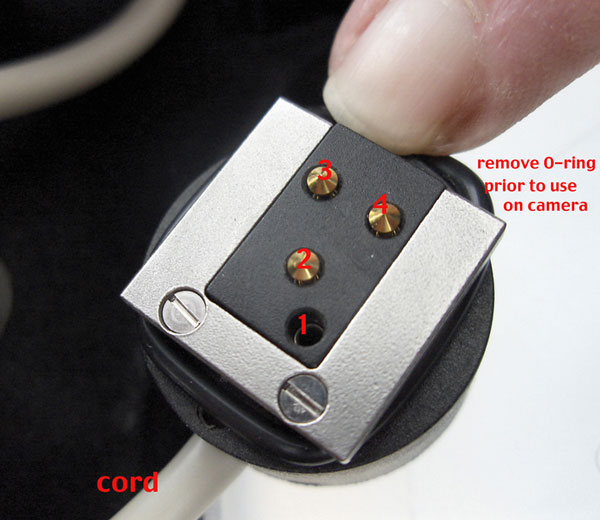
For most other strobes, we recommend having pins removed in the 1 and 4 slots, with pins 2 and 3 only in place. Save the pins, however. Seacam’s new I-TTL enabled Seaflash 250 will need them to be reinstalled according to strobe owner’s manual directions.
Note #1 - The factory configuration with all pins is necessary for i-TTL utilizing Systemflash with Nikon speedlights and Seacam Seaflash 250.
Note #2 -
IMPORTANT
- When you add a second flash, we recommend you remove the pins in the 1 + 3 + 4 positions. You will, however, lose the ready light signal in the camera’s viewfinder from the main flash. Images will write reliably to card this way though, so the tradeoff is reasonable.