Aquatica 5D Housing: First Impressions
After Canon released its 5D as the least-expensive full-frame sensor DSLR, I was immediately intrigued – I had seen the performance of other full-frame cameras while working on the Shear Water, and had been highly jealous of the Nikon users who had a 180 degree fisheye available for their cropped-sensor cameras. The unfortunate loss of some of my camera equipment (Canon 20D) put me in a position to upgrade, so I purchased a new 5D. I had spent time with the camera above water and even managed to put it into a Sea & Sea DX-30/60 housings (albeit with loss of many controls) for limited underwater use while I awaited the housing offerings. This camera has been discussed at length, so I won’t get into a detailed review of the camera itself, but rather will focus on the new housing from Aquatica.
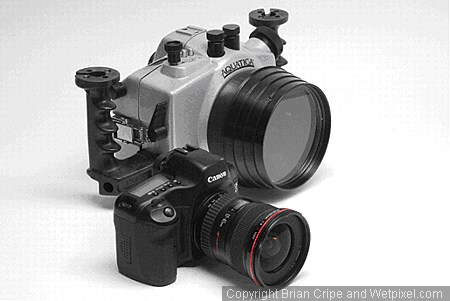
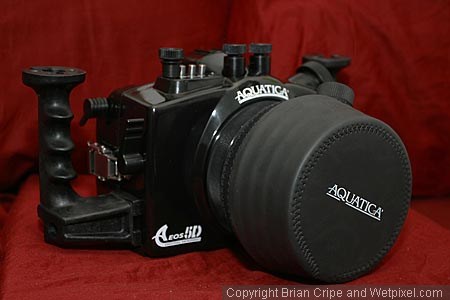
I selected the Aquatica housing for a number of reasons. Some of my diving takes me to greater depths than polycarbonate housings can withstand, so an aluminum housing was where I focused my efforts. Aquatica was the first to the market with such a housing, and they have done a superb job. The housing comes in silver as a standard color, but custom colors are available. I ordered my housing in black (some photos are stock from Aquatica of a silver housing – the black housing is mine). Here are my initial observations of the housing/camera combination.
Controls/Camera Menus
The Aquatica 5D offers access to all controls on the 5D with the exception of the print button and the multi-controller button. The latter of these is useful while shooting on the surface for focus-point selection, but underwater its function can be duplicated with the aperture dial.
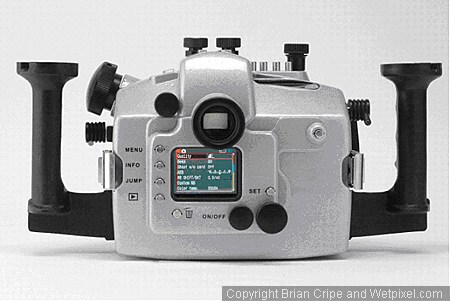
The menu is clearly visible through the rear window. The same window also houses the moisture alarm light, which sits in the periphery of my view when I am using the housing with a mask on. I haven’t seen this alarm in action so I can’t comment on how obvious it is, but this is one feature I hope to never need.
The settings LCD on the top of the camera is clearly visible with access to all controls including the backlight (helpful when shooting at night). There is a small window that also allows viewing of the mode-dial setting (something many other housings I have used have lacked).
Setting up the Camera
Preparing the Canon 5D camera for placement in the Aquatica 5D housing is not totally foreign territory for housing users, but it is different than some other systems that I have used. This is the same mechanism employed on the Aquatica D2x housing, and works extremely well.
- Remove the viewfinder eyepiece from the camera. This slides up off of the viewfinder.
- Insert the battery and compact flash card into the camera. The CF card can be changed without removing the camera from the housing, but the battery door is obscured by the mounting plate.
- Attach the mounting plate to the camera via the tripod screw hole.
The camera is now ready to be placed in the housing.
Setting up the Housing
- Open the housing by opening the two stainless steel latches on the side of the housing and removing the back of the housing.
- Clean and grease the main o-ring on the housing. Aquatica provides 0-ring grease with the housing (which appears to be Christo-Lube, but the directions don’t specify special grease – they simply say “silicone grease”).

Inserting the Camera into the Housing:
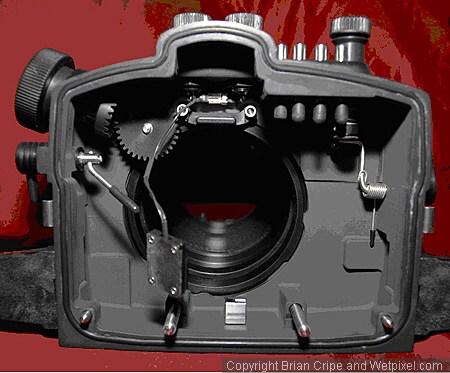
- Carefully align the mounting posts on the housing with the holes on the mounting plate. It is also necessary to lift the shutter-speed dial to make sure it doesn’t catch on the camera during insertion.
- Slide the mounting tray/camera into the housing. When the tray is fully inserted, rotate the locking lever (in the center of the tray) clockwise until it clicks into place. The camera is now secure.
- Slide the strobe sync cord into the hot shoe on the top of the camera.
- Place the rear section of the housing onto the front of the housing while insuring that the two pins on the front section are aligned with and slide into the holes on the back of the housing.
- Close the two stainless steel latches on the sides of the housing.
- Rotate the shutter-speed dial to engage it with the camera.
The housing is now ready to attach the lens port and strobes of your choice. Be careful to properly clean and grease the o-rings on the lens port (and extension ring, if one is used) and the strobe sync cords.
Observations
I have been using DSLRs underwater for the past 4 years – I’ve owned the Canon D60, 20D, and now the 5D, and housings from Sea & Sea and Aquatica. Prior to that I shot with a Nikonos and then Olympus compact digitals. I have also had the opportunity to see/use housings by Nexus, Seacam, Subal, and others while working on the Shear Water. After limited time in the water with this setup I am very enthusiastic about the future use of this housing and I feel that it compares well to the housings by other manufacturers. The engineering is excellent and the controls work very well. The mechanism for mounting the camera into the housing is the easiest/most secure that I have encountered.
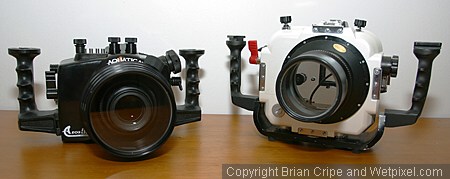
One of the best things about this housing is the size – it’s very compact compared to other housings I have used (although I admit the DX-30/60 was uniquely large for the camera body size). Below is a side-by-side comparison of the two housings.
The balance of the housing in the water is good – the housing is slightly negative, which I prefer (I am shooting with 2 Sea & Sea YS-120s). With the macro port the housing is a bit on the heavy side – not as bad as some housings I have used, but still significant. It may be worth investigating some sort of buoyancy ring like what James Wiseman made for his Seacam housing. I’ll have to look into this more because I don’t want to obscure the manual focus knob on the macro port.
The viewfinder optics are good – the image is easily viewable without moving around, including the exposure information at the bottom of the viewfinder.
I am awaiting a few extension rings from Aquatica to test the appropriate ring for with the 17-40L – I’ll report when I have those results. The corner sharpness with the Sigma 15mm fisheye is very good – James has posted results with the 24/f1.4L also which look great. This camera is very fast focusing underwater – it seems faster than the 20D with the same lenses.
Conclusion
I have only had limited opportunity to take this housing in the water (i.e. the local pool) because of my recent schedule, but I will have this on a trip next week. I’ll plan on posting images as soon as I have them available – overall I feel that this is an excellent housing and Aquatica has done a wonderful job with it.