Adobe Lightroom beta4 vs. CaptureOne 3.7 Raw Conversions
Platform: Windows XP
Subject: Frogfish, Papua New Guinea, August 2006
Photographer: Eric Cheng
Camera: Canon 1Ds Mk II, 2 x Ikelite DS-125 Strobes
Shot Details: ISO 200 f7.1 1/60s
Warning: this page uses 2.1 megabytes of images, which will be pre-loaded when the page first appears. If you are on a slow connection you may need to wait until all of the images have been loaded before you can compare images below.
Quite a few people I know have been extolling the virtues of Adobe's new Photoshop Lightroom beta (as of the writing of this article, Adobe is on their fourth public beta release). Always on the lookout for new photo organization, workflow, and raw conversion software, I decided to give Lightroom a try.
My workflow has always consisted of numerous applications including what I consider to be "best of breed" apps for image browsing, organizing, tagging, converting from RAW, and editing. Each of those steps has always required the use of a different application, and even though this results in a more complicated workflow, I find that I get better results in less time when compared to doing the same thing in applications that claim to do it all.
For example, on a Windows machine, I use:
- Downloader Pro for downloading, renaming, and automatic metadata tagging
- ACDSee for non-RAW image viewing
- BreezeBrowser Pro for quick RAW image viewing, EXIF copying, commenting of images in EXIF/IPTC/XMP, and custom HTML generation
- CaptureOne for RAW conversion
- Adobe Photoshop CS2 for image editing
- iView Multimedia for image asset management
I've just started using Mac OS, but already I've been using:
- Photo Mechanic for image viewing (why can't you look at images quickly on a Mac?!)
- CaptureOne for RAW conversion
- Adobe Photoshop CS2 for image editing (can't wait for the Universal version)
- Aperture for image asset management (frustrating that it won't allow external RAW converters)
But anyway, enough about my workflow. This article is a comparison in RAW conversion between Lightroom b4 and CaptureOne 3.7.
These RAW conversions use default settings on both Lightroom and CaptureOne, with the following exceptions:
- CaptureOne is using Etcetera's custom "LoSat" camera color profile for the 1Ds Mk II
- CaptureOne's noise reduction level has been changed as noted below each conversion example
- Lightroom 's Sharpen, Smooth, and De-noise settings have been changed as noted below each example
None of the other settings have been changed (exposure, white balance, etc.).
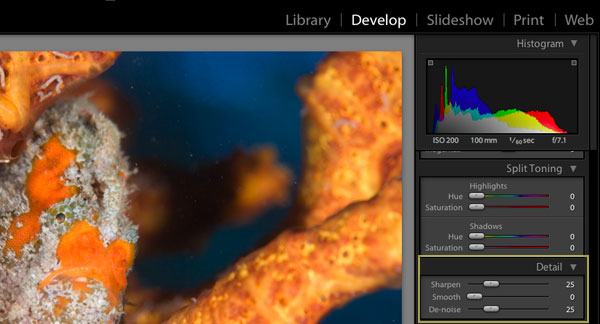
An illustration of the Sharpen/Smooth/De-noise settings in Lightroom
Mouse-over the links below the image to see Lightroom's conversiona vs. CaptureOne's conversions. All images are saved as high-quality JPG images tagged with sRGB. You will see some JPG artifacts, but I don't think they are bad enough to prevent a superficial comparison.
Here is the full, unaltered image as converted from RAW. It has been reduced to 600x400 pixels in Adobe Photoshop CS2 using "Bicubic sharper" and converted to sRGB for presentation on the web. The areas marked in yellow have been cropped to 100% in examples further down on the page.
Full image, resized:
Show 100% Crop Areas | Lightroom Convert | CaptureOne Convert
(mouse over the links above)
In this example, Lightroom has over-saturated the orange areas on the frogfish's face, blowing out some of the detail that CaptureOne retains. Lightroom's blues are deeper and more saturated as well, perhaps a symptom of it's default Shadows level of 5. It's possible that a conversion with Shadows at 0 would result in a flatter image closer to C1's conversion.
100% 600x400 pixel crop of eye area:
Lightroom (Sharpen/Smooth/De-noise): 0/0/100 - 25/0/75 - 25/0/25
CaptureOne Noise Reduction: Med-High - Low
(mouse over the links above)
A closeup comparison of the eye of the frogfish shows CaptureOne's retained detail in the orange area in the upper-left part of the crop. Lightroom's version is over-saturated. In Lightroom, the difference between a De-noise setting of 100 and 25 is noticeable. Lightroom at a De-noise setting of 100 retains more detail than at a Low setting in CaptureOne, but there is clearly more noise in Lightroom's conversion.
Lightroom (Sharpen/Smooth/De-noise): 0/0/100 - 25/0/75 - 25/0/25
CaptureOne Noise Reduction: Med-High - Low
(mouse over the links above)
Here's where Lightroom really suffers. Smooth color areas are marked with a lot of noise even when set to a De-noise setting of 100. In theory, Lightroom's default Shadow setting of 5 should reduce perceived noise in dark areas as it pushes those areas toward black. In this case, noise would be even worse with a Shadow setting of 0 (which would reduce contrast in dark areas).
At a Noise Reduction setting of Low, CaptureOne's smooth color areas have less contrast but are almost noise-free. In C1, it's hard to tell the difference between Noise Reduction settings of Low and Med-High. Note that the C1 examples in the example above suffer greatly from JPG artifacts because they are so noise free. The uncompressed examples look better.
CaptureOne's silky images do come at a price. Unfortunately, there isn't any noise-reduction setting between None and Low, which is still quite aggressive. One of my friends prefers to turn noise-reduction off during RAW conversion in favor of using third-party NR applications like Noise Ninja and Neat Image (both of which are excellent).
Conversions done in Lightroom almost certainly require some noise reduction work during image editing. Because I use CaptureOne for most of my conversion work, I find that I only need to de-noise images during editing if I am shooting using high ISOs (1000+) and have pushed the exposure of the image during RAW conversion.
Note that there are certainly some images that I prefer to convert using converters other than CaptureOne. I find that I prefer to use Adobe's Camera Raw on very specific images and Canon's DPP on others. The RAW conversion process has a huge impact on what digital images end up looking like, and it's important to understand the differences between the various converters.
Having read all of this, keep in mind that if you absolutely nail your shot, you will most likely have an image that requires little-to-no RAW conversion and Photoshop work! For most people, the bottleneck in getting better images doesn't have anything to do with the mysteries of various RAW converters. :)
ADDENDUM: I know that by default, Lightroom applies saturation boost and a mild contrast curve. One of my friends tells me that there is a conversion recipe called "Zero Out" which flattens everything. While this test used default conversion settings for both Lightroom and C1, it would be worth doing your own tests to see if Lightroom is less noisy when zeroed out.